How To Make Wicked Witch Legs:
This Wicked Witch Leg tutorial was submitted by Micki Hares from A Whim and A Prayer Custom Creations. Micki is also a member of our Home Decorating, Upcycling and DIY Facebook group. If you would like to share a project to be featured on this site, you can do so here.

Materials used:
This post contains affiliate links for your convenience, see full disclosure here
- Chicken Wire
- Scrap cardboard
- Modpodge glue although I made my own (see recipe below)
- Newspaper
- Spray paint (this is the glitter brand I used)
- Old pair of shoes
- Scrap wood
- Pair of long black and white socks
How To Make these wicked witch legs:
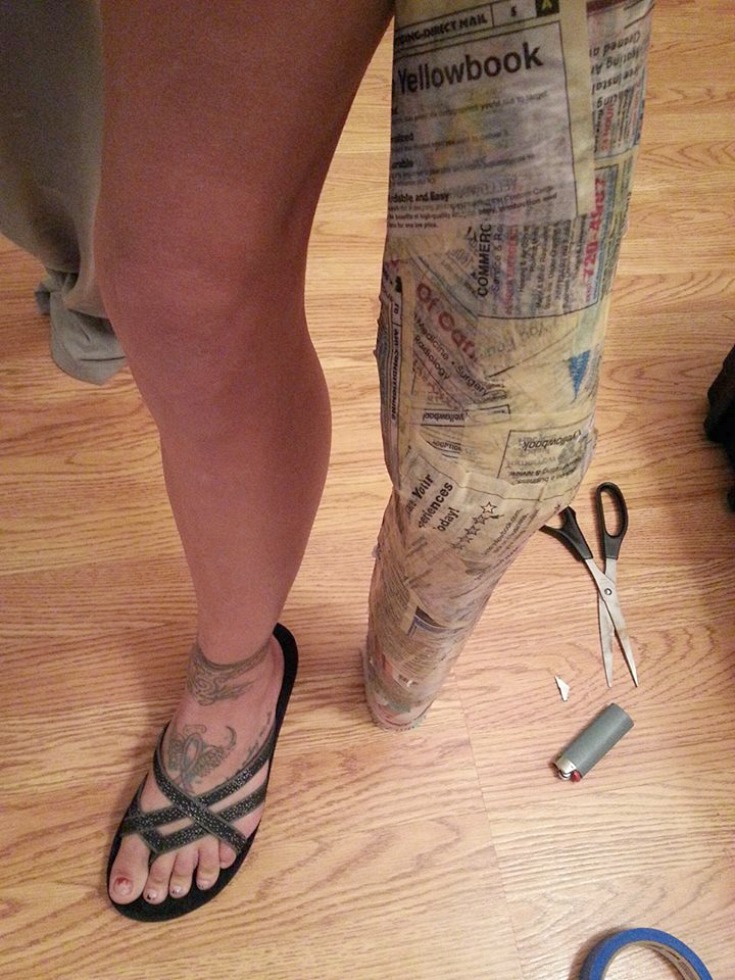
1. I first cut scrap chicken wire to the length of legs. Making sure to add extra for “knee bend”. I Then used scrap cardboard to create back section of the leg.


2.I made my own modpodge glue with the below recipe.

3. I then used newspaper and old phone book pages to paper mache around the legs and then left to dry overnight.
4. I also spray painted a pair of shoes I rescued from a church rummage sale


5. I cut a small scrap piece of wood to fit inside the shoe.
6.I then took the piece of wood, put it inside the foot part of the sock, put that into the shoe then pulled the sock onto the leg
7.I placed two pieces of scrap wood into the hedges and flipped the legs upside down onto the scrap wood stakes.

They provided sturdiness and allow the legs to stay upright in position instead of falling into the hedges.
And there you have it! You can see more of my work at A Whim and A Prayer Custom Creations
THIS BLOG HAS RECENTLY BEEN VOTED FOR BEST HOME AND DIY BLOG – I would love if you could spare a moment to vote for me here! Thank you!


Here are some more inspiration photos of DIY Wicked Witch legs from members of the GRILLO DESIGNS HOME DECORATING, UPCYCLING AND DIY FACEBOOK GROUP (click the link to join the group)


HOW TO MAKE A PUMPKIN WREATH FOR YOUR DOOR!

HOW TO MAKE DIY PUMPKINS FROM DRYER VENTS

HOW TO MAKE A FLOATING TEA CUP


What would you suggest for waterproofing should the weather turn out to be uncooperative?
Try an outdoor varnish/poly!
Outstanding!!
Hey sweety I love your page you do a wonderful job on your stuff,,it is sooooo cute,,I went and voted for you so i hope it’s not to late and i hope you Win,!!!!! Love your work so keep it up with new stuff,,thank’s,,,,Christy[p,,,,,
Wow thanks so much for the vote Christy!
This is so quirky! Love it! Perfect for all Wizard of OZ & Wicked fans!!
[…] CLICK HERE TO FIND OUT HOW TO MAKE THESE DIY WICKED WITCH LEGS […]
[…] Grillo Designs […]
[…] Designs ~ DIY Dryer Vent Pumpkin Tutorial Grillo Designs ~ Pumpkin Wreath Tutorial Grillo Designs ~ Micki’s Wicked Witch Legs PS I Love You ~ Fall Cricut Cards The Natural Homeschool ~ Fall Treat Baggies Tutorial The Natural […]
[…] DIY Witches Legs […]
[…] Witch Legs […]
[…] Witch Legs – I know my grandma would get a hoot out of these. Maybe something we will have to go and do for her. […]
As far as I care, you are GREAT and would love to meet you and go to your classes.
I was just curious are these waterproof? Did you put something on the paperbacks?
I love these!! And, I’m pretty sure it is exactly what my front porch needs.
These are really cute! This would be the perfect Saturday DIY for me and my girls 🙂
I found my halloween project!
Oh my word! I love these! Super cute. I’ll have to dig at the thrift store for some fun “witch” shoes 🙂
Love these! So cute and clever!
That is seriously cool. I’ve seen stuffed socks with shoes looking like it’s coming out from under a house- but upside down in the bushes?? Above and beyond. Bravo.
I am not sure why, but since I was a little kid, I have never liked the Wizard of Oz. With that said, I absolutely love your witch legs! My husband puts out a life-like replica of himself sitting in a chair with a mask on. It always creeps out the kids because it looks so real. Well done!
OMG….love this….one of my favorite movies too…so cute for Halloween
These are so fun! Thanks for the tutorial!
These look amazing! I just might have to try it 🙂
They look so cute. I love them.
Omg so cute. How long did it take? I must do this for my house.
These took only a couple hours of actual work time. I did let the paper mache cure over night before putting them in the socks just to make sure they were fully dry first.