This Dresser to Bench Project was submitted by Alice Woods-Smith from Inspired Junk. She is also a member of our Home Decorating, Upcycling and DIY Facebook group. If you would like to share your projects to be featured on this site, you can do so here
Materials Used:
- Wax
- Dresser
- Circular saw
- Nail gun
- Chalk paint (You can also learn how to make your own here)
How to:
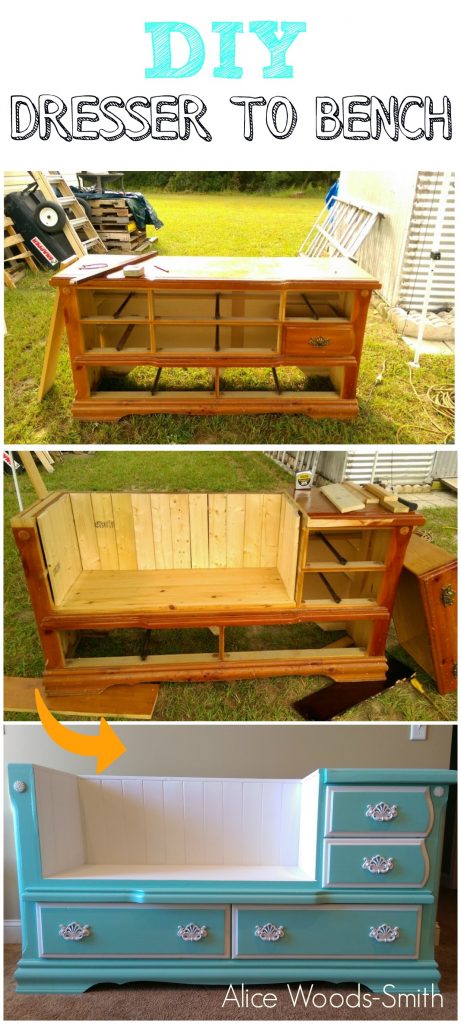
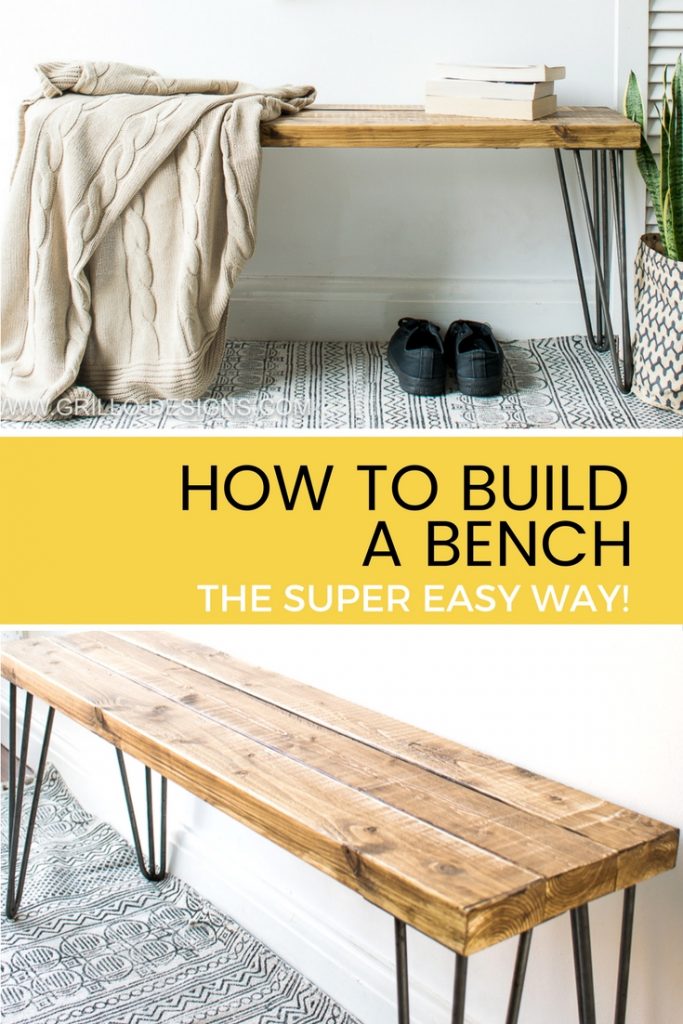
First we looked on Pinterest and got some ideas on dressers to benches. We found a dresser that we thought would work and took all the drawers out.
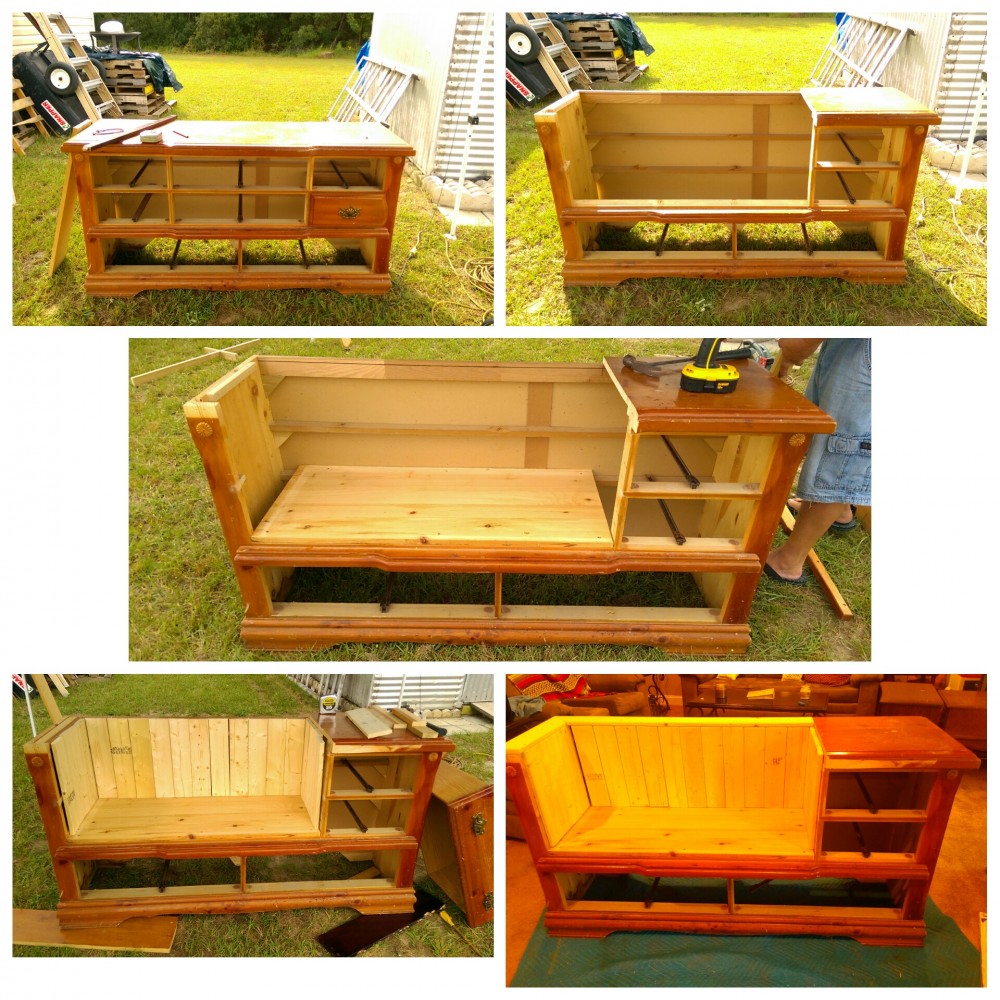
Figure out which drawers you’re going to cut out and we used a circular saw to cut top off, it really is easier than you would think. We used the top as the bench seat just turned it over and used the nail gun.
[wp_ad_camp_1]

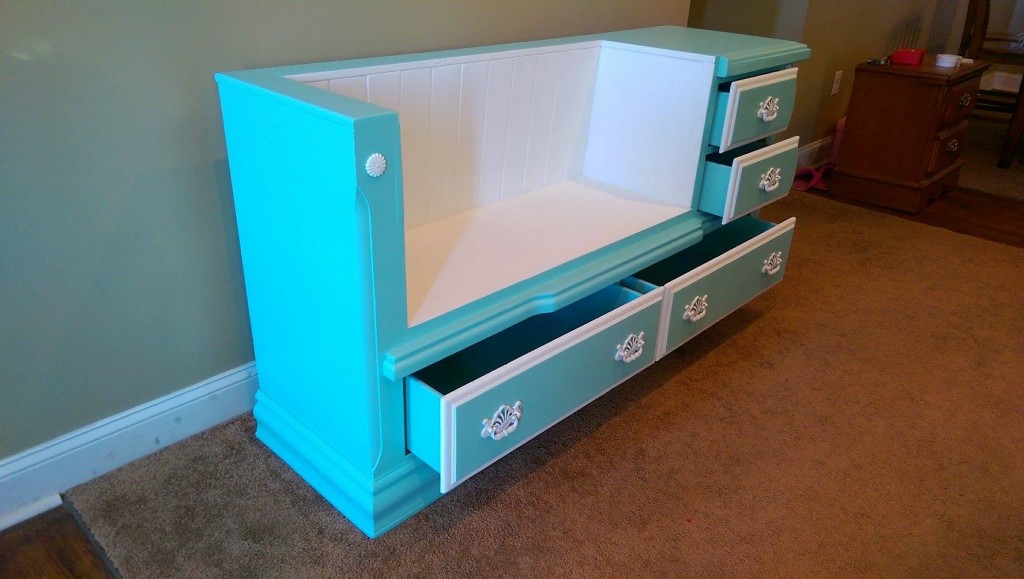
We put in a few supports to make sure it stayed sturdy. For the back of the bench we used 1 x 4’s and again used the nail gun to attach. I then chalk painted and sealed with wax.
To see more of Alice’s work, visit her facebook page Inspired Junk
ALICE WOODS SMITH
My name is Alice and I’m from southeast Ga, USA. I’ve been upcycling furniture for the last 8 months and love it! I along with 2 friends have a FB page called Inspired Junk we upcycle furniture, a lot of chalk painting as well as making custom benches out of headboards & foot boards that our clients own. We take heirloom/childhood beds that are gathering dust in the attic and make a beautiful and useful piece of furniture that can be appreciated by the whole family.
My name is Alice and I’m from southeast Ga, USA. I’ve been upcycling furniture for the last 8 months and love it! I along with 2 friends have a FB page called Inspired Junk we upcycle furniture, a lot of chalk painting as well as making custom benches out of headboards & foot boards that our clients own. We take heirloom/childhood beds that are gathering dust in the attic and make a beautiful and useful piece of furniture that can be appreciated by the whole family.
If you have any questions for Alice or would like to share your thoughts on this project, please leave a comment below.


Join Grillo Designs on Instagram and Pinterest to keep up with our latest posts and ideas. If you’re on Facebook, why not join our Home decorating, Upcycling and DIY group too – inspiration is guaranteed!


Thank you for sharing! I have an old dress I was going to give away…. not now!
[…] furniture hack via grillo-designs. […]
What color it’s that? So pretty! And very creative
Hi Just seeing this comment. I actually mixed a couple colors that I had left over. It looks a lot like Tiffany blue/green.
[…] via grillo-designs […]
[…] idea to turn a dresser into a bench is genius! This would work so nicely in a […]
Do you have any step by step photos of the bench project, like where to cut top, where to put supports, how the bench bottom was put in and the back and side of it? Thank You
Sorry for this project I dont. But there are some other bench tutorials on this blog if you search diy bench!
Sorry no just the one posted. We just watched a couple tutorials and winged it. We’ve made several since and it gets easier.
This is the greatest pin I have seen. You did a remarkable job!
Thank you!
My oldest son just broke his toddler bed that I cherish bc my dad built it before he died. He out it together should I say? I’d love to change it and be able to have a bench forever and ever ….
[…] Details here. […]
[…] Make a seat. A simple reconstruction of a long dresser makes for a chic entry bench within a home. Add to this look with your personal choice of paint or pillows. Get the instructions by clicking here. […]
[…] DIY Instructions and Project Credit – Grillo Designs […]
[…] Click here for full details […]
[…] Details here. […]
[…] If you liked this project, you might also like ALICE’S DRESSER TO BENCH […]
Love your ideas
Love the idea of using the top to make a bench seat. This is a real statement piece and I love it.
Thank you!
This is a fabulous idea, it looks like its from tiffinys 🙂
Thank you!
Wow what a project! I love what you’ve done and the colour looks amazing 🙂
Thank you!
this is such a great idea, I love the colour you chose and I have never heard of chalk paint before, I’m off to read up on it.
Thank you! Yes, when I first heard of chalk paint I was like what? lol I watched so many YouTube videos!