Have you fallen out of love with your current rented kitchen? In this post, I’m sharing an easy rental kitchen update – how to create open plan shelving from existing cabinets.

** This post has been sponsored by Argos Home and may contain affiliate links. Please see my disclosure page here
Renting has its perks.
However, bathrooms and kitchens are rarely ever included in that ‘perks package’ You either get a great kitchen or bathroom – or you dont. It’s just one of those things you learn to accept when you rent- especially if the rest of the house happens to be in good condition. . . and if your landlord isn’t half bad.
Whilst you can’t make any drastic changes to a rented kitchen (as most of it will have been built in before your arrival), you can customise it somewhat. And often you can do so, in a way that doesn’t cost you your security deposit at the end of your tenancy (music to any renters ears right?)
Small changes, big impact – and all that.
After living with my mediocre kitchen for over 3 years, a few weeks ago I finally decided it was time to put that thought process into practice. I mean, as far as kitchens go, mine wasn’t that bad. It was just so very basic . . and so very not me. And more than anything I craved a kitchen that felt like me.
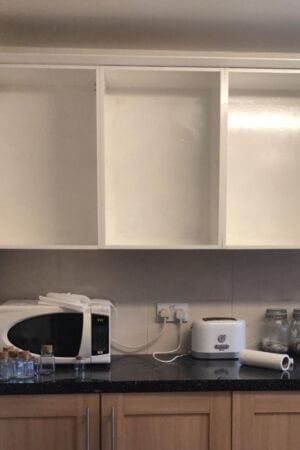
Here is a peek of it from my dining room (which is a space that IS me) .

Winter is coming (anyone else read that and think of Jon Snow?). To be honest, it’s kind of unofficially here already. Since the colder weather usually meant I’d be spending a lot more time indoors, it was especially important that I liked how the inside of my home looked – in particular the kitchen.
PART 1 OF RENTAL KITCHEN UPDATE: OPEN PLAN SHELVING
The idea was to go with an open plan look for the top cabinets that I hoped would brighten and lift the flow of the room, you know, like I mention in my book. But of course, as I rent, I wasn’t about to rip everything out and install wall shelves. So I had to figure out a way achieve that concept using the existing cabinets.

Now, I’m not a naturally tidy person
And trust me, it’s taken me a long time to finally admit that to myself (being married to an incredibly organised person for 9 years might have had a hand with helping that realisation along) You see, my husband will put things back after he has used them without a moments hesitation. I on the other hand, will take things out, and make a note to put it back later.
Except ‘later’, sometimes ends up being ‘never’. And things start to build up. Like really build up. Then I get overwhelmed, I do a major clean and vow to be more tidier, more organised, more everything, and then it starts again.
There is a clause to this cycle of mine though. And that is design. There are times when I manage to keep things tidy for the sake of keeping up a good design. . and this recent kitchen update is a good example of that.

HOW TO CREATE OPEN SHELVING FROM EXISTING CABINETS
WATCH MY VIDEO TO SEE THE PROGRESS IN REAL TIME!
Step one: Remove the doors from the top cabinets.
And store them somewhere safe – screws included. Simple. Or at least I had hoped it would be. Which brings me to . . . .

Step two: Asses the ‘damage’
Once the doors were removed, I noticed that the inside of the cabinets didn’t look great. They were stained, and had a yellowish tinge to them. I decided to paint them white. I wont go into too much detail about this part , as I’ve already walked through the process of painting melamine or laminate in a previous tutorial.
Important to note here that you will need to get permission from your before you start any type of painting in your rental.

There were also holes where the doors had been. If you dont plan to put the doors back on, you can fill the holes in with white wood filler. Here is a great article on how to repair wood.
Step three: Add a striking feature!
Painting the insides a bold colour was an option (I had done similar to the shelves in my living room). However, I wanted something a little less permanent so chose to apply the magical stuff I’m always raving about instead.
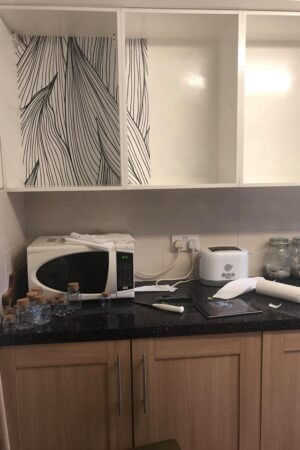
Yes. Removable wallpaper. The paper you can apply and remove at your leisure. Its pretty awesome. Here is where I bought mine from.

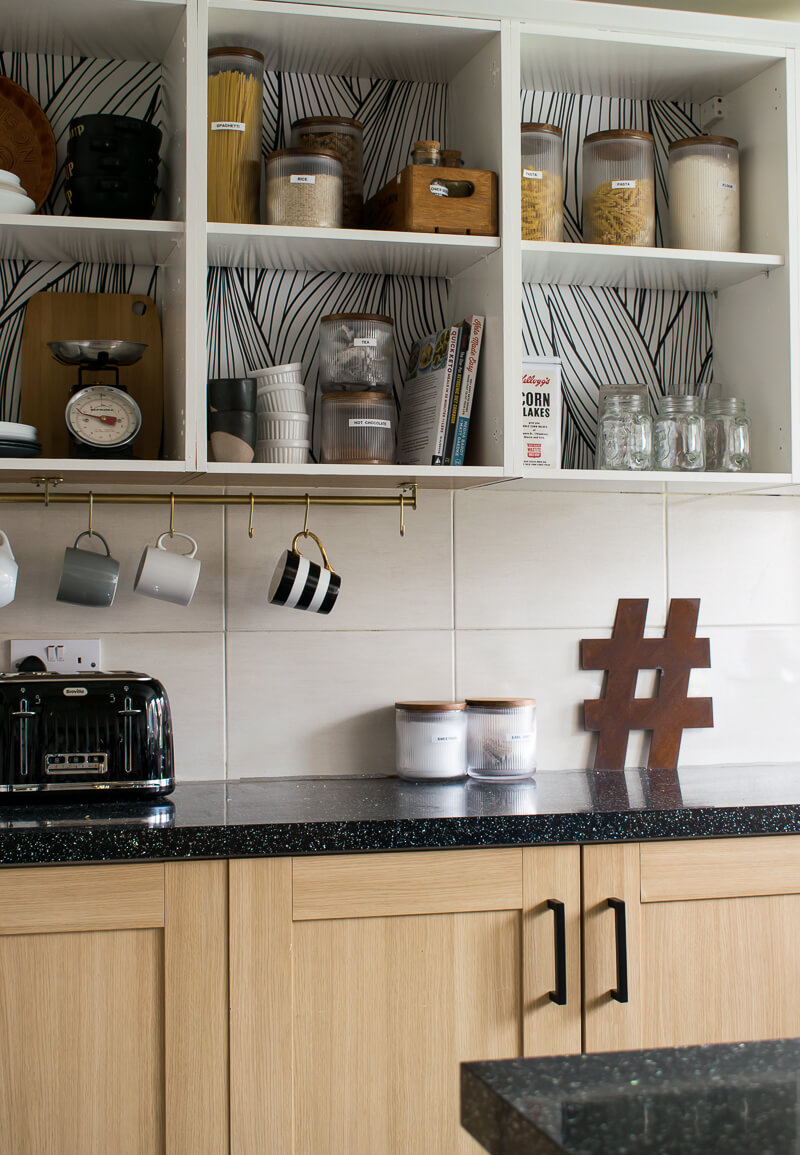
Step four: Declutter and display
This is where Argos Home comes in.
They are usually my go to place for stylish homeware items at affordable prices. Their same day delivery Fast Track feature isn’t bad either, but I digress.
Here are a few items that I selected from Argos Home that I felt would add some style and colour to the shelves.
- Ribbed Glass jars Canisters in various sizes
My top cabinets housed a lot of dried food like pasta, herbs, powders, etc so putting them in to containers like this has really helped to streamline everything.

I used the larger jars for pasta and rice, and the smaller jars to store coffee , tea etc. These jars have an air tight seal on them and a gorgeous wooden lid to match! And of course I labelled everything with my new label maker!


- A chrome rail with hooks attached to the underside of the cupboards.
I spray painted this brass! This rail was used to hang mugs and other utensils with the aim of keeping the countertops a little less cluttered. You might need permission from your landlord for this step, as you’ll be screwing into the wood. Alternatively you can use adhesive hooks.

SOURCES: GREY MUGS
A lot of the dish-ware in my cabinets were either mismatched or chipped. It worked, when you couldn’t see them. But now that everything is on show – things needed to look a little more cohesive.

These mustard yellow plates and bowls are the perfect addition to my new open shelving.
A large portion of my kitchen wall consists of tiles so I hung these cloths using self adhesive hooks (that I spray painted brass) .

A few other updates to this rental kitchen included :
- Replacing the silver handles with these black modern ones
- Hanging some art on the wall
- Buying a new toaster!
- Adding a warm rug to the floor

Let me know what you think of this update?
I’ll be sharing more of my rental kitchen update on my instagram stories! There’s still quite a few things that need to be done
- Change flooring
- Change bottom cabinet doors
- Re-caulk the counter tops
- Paint the walls
- Change the lighting
- Add in more storage for spices ie. Locker perhaps?
- Add curtains/blinds

***This post was sponsored by Argos home. I received products and payment for my time creating this post. I only partner with brands I LOVE and think you will LOVE too! All ideas, photos and opinions are 100% my own.


HOW TO DECLUTTER KITCHEN COUNTER TOPS
HOW TO ORGANISE A KITCHEN WITH WOODEN DOWELS


Thank you!
Hi Medina,
I absolutely love the kitchen makeover, it’s beautiful and definitely goals. Always looking forward to your content . Awesome.
Thank you so much!
Hello!
Your post has inspired me to do the same thing with my cabinets. I need to paint the outside of my cabinets, and I have a feeling that (to get the matching shade of white) I’m going to have to paint the inside as well.
How did you handle the awkward angles of painting inside a cabinet, and the angles? Schlafly, I have adjustable shelves and I’m debating if I should fill the holes in and paint, for uniform look, or leave them open for future adjustability.
Thank you!
I love everything you do. If you could cover your backsplash with a vinyl tile, what sort of pattern (or solid) would you pick to go with your awesome temporary wallpaper?
Gorgeous kitchen, but truly AMAZING dining room with chalkboard paint… DREAMY
Thanks!
You are a creative wonder! That is a bold Move considering most cabinet doors hide a many unorganized indiscretions. Love how it highlights your chalk wall leading to the kitchen. Thanks for the darling idea!
Thanks so much carla 🙂
I love everything about this makeover! I plan on making my kitchen cabinets into open shelving in the next month or two, so this blog post is the perfect little inspiration I need. I’m especially excited about checking out the removable wallpaper link you included. That stuff is magical! 🥰 Thanks for sharing your DIYs with us! 💌
Ahh thanks so much!
Looks fabulous! I’m now tempted to do this in my own kitchen (even though it’s not a rental). Thanks so much for the inspiration!
You are so welcome!
It’s great! I really like the wallpaper, it’s not too monotonous but it’s simple enough and it goes great with those dishes and other jars. Nice job!
Thanks so much!
Like your style very much including the wallpapered cabinet backs – wish we could get something similar here in new zealand. I also enjoy how you mix wood and china (?) in your displays. One of life”s pleasures to get your updates. , Kate
Thanks so much Kate!
Great idea! I already have open cabinetry in a bathroom (can’t afford new doors at this time) and I LIKE the wallpaper idea. Thanks,
Lee from Oklahoma
Thanks Lee!
Wow! It looks fantastic! Look forward to seeing Phase 2. D💛 xx
Thank you!
Amazing girl.or guy
What spray paint did you use to make it brass please? It all looks so great!
Hi sarah. I used the plastikote brand in brass!
love what you did
Thank you so much! Glad you like it!
It looks fab Medina! That wallpaper is Ace! What a brighter happier space.
Thank you so much Sarah!
Ditched my microwave years ago. Your kitchen remodel looks great so far. Wallpaper was a good choice! Look forward to additional updates.
Thank you!