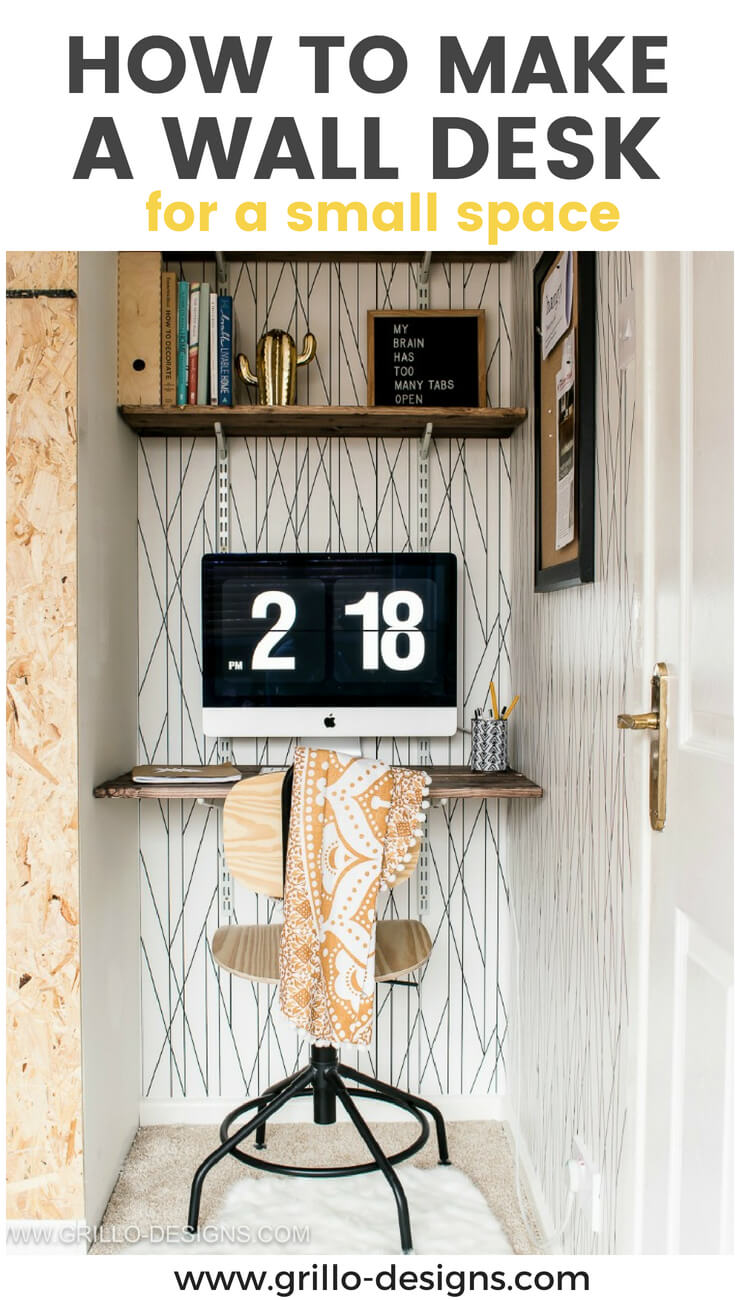
This easy DIY wall desk is a great space saving idea for small homes or apartments! The twin slot brackets system allows you to change things up when you need to – without (wait for it) having to make extra holes in the walls. Bonus!

If you caught my bedroom makeover post a few months ago, you might have seen that I decided to convert the little nook next to my wardrobe into a mini work space.
Yes I know… a work area in the bedroom is a huge no no (for feng shui anyway ), but hey … limited space can sometimes make a girl feel desperate….
… or resourceful .. depending on how you look at it.

Also, my husband has taken over our spare room and turned it into some sort of man cave? I try to avoid going in there as much as possible to be honest.
The decor hurts my eyes.
BUT TO GET TO AN ACTUAL POINT
The reason why I’m writing this post, (as a sort of spin off to my bedroom reveal I might add ) is because I’ve had so many questions about this space – in particular the shelving I used and the wallpaper.
(Side note: You guys loved this wallpaper! Dont blame you.. I love it too. Which is why I ended up buying it, ha!)

So I thought I’d put together like a mini tutorial on how I created the shelving and wall desk.
Full disclosure though…. this was a ‘sidelines project’
As in, one of those projects where I gave all the ‘stuff’ to my very handy husband and took a back seat.
I looked on. Issued directions. Praised when morale was low.
You know, those sort of things…
I might not have moved much physically – but my mouth sure did. I’m telling you, it takes a certain type of person to be a ‘sideliner’
And turns out, that type of person was me!
MATERIALS NEEDED TO MAKE THIS DIY SHELVING AND FLOATING WALL DESK:
This post may contain affiliate links. When you buy a product through one of my links, I get a commission at no cost to you! For more, see my disclosure page here
- White Twin slot uprights x 2 ( US source / UK source )
- White Twin slot brackets x 6 – I bought four 16cm long brackets and two 47cm brackets (for the desk part)
- Pine wood W 11cm D 2cm – the length of wood you need will depend on the size of your alcove/nook. You can also use scaffold boards of pallet wood to make your shelves and desk
- Rustoleum Dark wax
- Mitre Saw – this is great for cutting wood this size!
- Screws
- Tape measure
- old cloth or Wax brush
- Drill
- Wall Plugs (anchors)
- Level tool
HOW TO MAKE A FLOATING DIY WALL DESK:
THE SHELVES:
1. Measure the width of your little alcove to get an idea of how long you need to cut each wood plank to make the shelves.
2. Once you are happy with your measurements, cut the wooden planks to size. As you might have seen from my pictures I connected two planks of wood together to give the shelves a little more depth (however you could just use one larger piece of wood if you wanted).
3. Sand the wood and then stain with Rustoleum dark wax used a cloth. FYI, here is all you need to know about how to use wax.

Leave the wood to cure for 24hrs

THE BRACKETS:
4. Now you need to attach the twin slot uprights. Each upright has ready made holes for you to screw directly into the wall.
Mark out where you want each shelf to go and drill a hole – securing with a wall plug. You can use a level at this point to ensure both uprights are parallel to each other (because uneven shelves are no fun).

5. Then add your brackets – they literally lock in… and you can change them up at any time. I used the 4 smaller ones for the top shelves and the larger ones for the bottom shelf.
It might be a good idea to grab your office chair and play around with comfortable heights before adding in the brackets for the desk part.
6. Add your wooden planks to the brackets you slotted in – you can screw them in further for added security (each bracket has two screw holes).

I ended up using four planks of the wood to make the desk top, but again you could use one continuous piece of wood that fit the exact dimensions. I however, like the slatted look.
Wasn’t that easy??
The wallpaper came a few weeks after but im pretty sure you dont need a play by play for that. Or do you?

HERE IS A LIST OF SOME OF THE SOURCES FOR THIS WALL DESK SPACE AREA:
Wallpaper – Milton and King
Chair – IKEA
Letter board (similar) – Amazon
Cork Board – Amazon
Tote bag – Nabilabee
WHAT DO YOU THINK OF COMPUTERS OR WORKSPACES IN THE BEDROOM? LET ME KNOW YOUR THOUGHTS?


HOW TO BUILD A HANGING SPICE RACK


That was great I feel inspired love the wallpaper… thanks
Thank you!