A DIY step by step furniture hack that turns pine furniture into a rustic LEGO® inspired wardrobe for kids! And organised with practical Curver Boxes.

*This post has been sponsored by Curver.
My seven year old son (yes, I know, seven! How time flies!) is obsessed with LEGO®.
Like, really obsessed.
To the point where (and this list is not exhaustive by the way, but if your child exhibits at least two of these symptoms, you might have a case of LEGO® – itis on your hands. I don’t advise visiting your doctor, as they won’t be able to help! The only ‘cure’ I know: Just roll with it and thank god they aren’t on an iPad. )
- sleeps with his LEGO® creations in his bed at night, and carries them around in his hands (or pockets) during the day.
- owns two huge crates of mixed LEGO®, the rest lives on the bedroom floor.
- will choose a LEGO® magazine over buying a new game, toy, or junk food.
- sings ‘Everything is Awesome’ ALL of the time when things clearly aren’t that awesome!
Is this picture I am painting ringing any bells at all?
If so, it’s ok. We’re all in this together. That excruciating sharp pain you experience from stepping on a LEGO® doesn’t get any less painful, but deep slow breathing really does help!
BUT WHERE DOES CURVER FIT INTO THIS?
I’m that mum, who likes to design one of a kind furniture pieces for my child(see here and here). I’m also that mum, who while moaning about all the LEGO®, actually encourages it!
That’s right!
I decided to add to the madness, and hack some pine furniture units to create a rustic LEGO® inspired wardrobe for my son.

I also decided to organise said wardrobe with Curver Storage boxes.
For years,Curver has been one of my favourite go to brands for storage. I’ve always loved the sleek design and practicality of their storage boxes, and also how they fit seamlessly into all environments. I already have quite a few other boxes from several of their ranges around my house in various rooms(see Living room).
Their products are built to last a lifetime, which can be seen from the quality. However, if the need arises, they are also 100% recyclable.

These particular boxes are part of theBETON range, and have a concrete effect finish. Perfect for a growing child’s room – especially if you’re going for an industrial vibe!

But before we get to the organising, let me show you how to hack everyday furniture to make this LEGO® inspired wardrobe.
MATERIALS NEEDED FOR THIS FURNITURE HACK
This post contains affiliate links for your convenience, see full disclosure here
- Pine Chest of 3 Drawers (80 x 57cm)
- Pine 2 door cabinet (80 x 50 x 83cm)
- x 4 wooden legs
- Varnish and cloth
- 3 x drawer handles
- Wooden dowels 7/8″
- Wood glue
- Optional : Sticky vinyl and sharpie
TOOLS NEEDED:
- Drill/screwdriver
- 7/8″ Hole cutter drill bit
- power Router
- Sander
HOW TO MAKE:
1 Assemble the drawers and cabinet (minus the doors). Use an electric screwdriver to save time.

Note: There is no need no need to insert the cabinet shelves as they will be needed elsewhere later.

2. Screw in four wooden legs to the base of the drawers.

I bought my legs from here. Alternatively you can use a different leg style if you’d prefer.
Secure the cabinet to the top of the dressers using screws. Pre-drill holes to ensure the wood doesn’t crack.
3. Add in a hanging rail (I used a wooden dowel). You can do this by drilling a hole on each side of the cabinet with a 3/8″ Hole cutter drill bit. Slide the dowel in space by applying some pressure

4. Now create the LEGO® effect for the doors of the cabinet.
To do this cut circles from the wood (which would have been used for the shelves). Use a router to cut these circles to size. You will need six cirlces in total – three for each door. See here to learn how to use a router

5. Place three circles on each door – making sure to space them out equally.
Once you are happy with their position, draw around each circle with a pencil so you dont forget their placement.

6. Apply wood glue to secure the circles in place. Leave them to dry for up to six hours!

7. Secure the doors back onto the cabinet and give the entire ‘wardrobe’ a light sanding

8. Next stain/varnish both the outside and inside of the entire ‘wardrobe’ (or paint depending on the look you are going for). I like to use this varnish as it is both a stain and sealant. Apply varnish with a cloth or sponge

9. Add handles to your drawers. I decided to make my own from left over wood, but you can buy your own here

And you are done!
Well almost! Dont forget about safety. You will need to secure the unit directly to the wall with child safe anti slip anchors.
OPTIONAL: I added in contact paper to the backing of the cupbard – and then hand drew a little LEGO® man with a sharpie pen!


ORGANISING WITH CURVER
I added in Curver storage boxes to maximise the storage capability of this wardrobe.
- I used a label maker to mark all of his boxes.
- I placed a few boxes in his top drawer for his under garments

- I put the smaller boxes inside the wardrobe for seasonal items

- I stacked the longer boxes on top of the wardrobe for toys, and magazines


What do you think? Do you have a LEGO® obsessed child who might like this idea? I’d love to see what you come up with!
**This post was sponsored by Curver. I received product and payment for my time creating (and styling) this post. I only partner with brands I LOVE and think you will LOVE too! All ideas, photos and opinions are 100% my own.


MAKE A BOOK SLING FROM A TOWEL RAIL
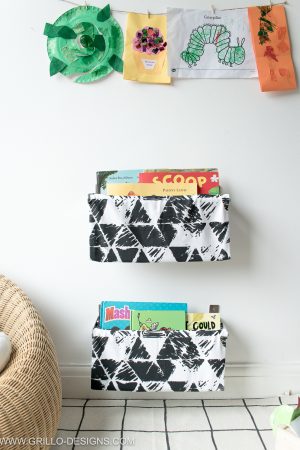


Great project!!!! wish I had one for my grandson.
Thank you!
Love this Medina! So simple but effective and a classy take on a Lego brick! Xx
Thank you!