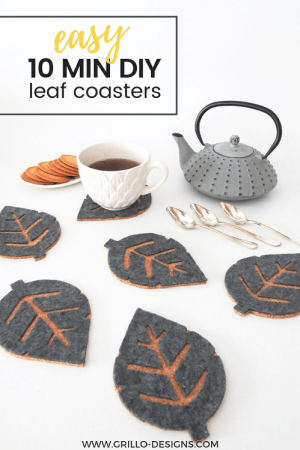
A tutorial sharing how to make DIY leather coasters WITHOUT using actual leather. See below for all the details. Follow me on Instagram for more creative ideas!

This post has been sponsored by Staedtler UK
Ok. I don’t want to keep you hanging for too long, so let me just tell you how I made these leather looking coasters without using leather (real or faux). . .
I used clay.
The modelling kind.
FIMO leather-effect clay to be exact. I don’t know about you, but whenever I hear the words FIMO, a wave of nostalgia hits me. I remember playing with FIMO clay as a child. I remember my little brother and I making Teenage Mutant Ninja Turtle figurines- or rather, lumps of green moulds that resembled them at least. It wasn’t about the finished product back then, as long as the execution part was fun.
Oh to be a child again! Life was simple.
I’d never tried the Leather effect FIMO clay, so of course I was really excited when FIMO reached out to collaborate! I went with a simple idea (I have the worst beginners luck) and decided to make these DIY leather coasters.

I’ve been wanting to buy some faux leathers coasters for a while to be honest, so this seemed like a great ‘kill two bird with one stone’ project to tackle.

The FIMO leather effect clay comes in 12 different colours, and is different from the other smooth finish modelling effect clay.

MATERIALS NEEDED TO MAKE DIY LEATHER COASTERS
This post also contains affiliate links for your convenience, see full disclosure here
- FIMO leather clay in Nut x 1 1/2
- FIMO leather clay in Black x 1 1/2
- FIMO clay machine or rolling pin
- FIMO modelling tools
- Brown Embroidery string and needle
- Craft or kitchen knife
- Round Metal cutter (or tart tin)
- Oven timer – similar here
- Baking tray
- Baking paper
- Acrylic roller
- Cookie Stamp Embosser – I used this one.

HOW TO MAKE DIY LEATHER COASTERS USING FIMO CLAY
1. Ensure you are working on a flat and clean surface. Open two packets of FIMO clay in ‘nut’ and roll into a ball using your hands.

2. Roll and flatten out the FIMO nut clay with an acrylic roller

3. For a more even finish, roll this clay through the clay machine starting at setting 1 and increasing to 4 (note: this clay machine comes with a clamp – which can be used to keep the machine steady while you roll). Your final clay needs to be big enough to cut 3 circles from it.

4. It is advisable to use metal confectionery cutters to cut perfect shapes out of FIMO clay. However, as I did not have this to hand on the day, I used a ceramic tart tin instead. I pressed the tin down firmly into the clay and cut around it with a knife.

5. Repeat this step three times (or more- depending on how many coasters you want).

6. Now it’s time to do the same as above with the FIMO black clay.
Roll out your black clay a second time, and cut out three circles. Make sure to keep you fingers clean when working with the different coloured clay to avoid transfers.

7. Place the ‘nut’ clay circle neatly atop the black clay circle. This will create a reversible effect and give the leather coasters more depth. Repeat for the other circles.

8. Using the pointy modelling tool, poke holes all around the edges of the coaster. This will be used later for the embroidery string


9. Use a cookie alphabet stamp embosser to engrave words on to your coasters. I chose the words ‘WATER’ , ‘COFFEE’ and ‘TEA’ but you can choose whatever you fancy.

Simply put the letters in the place fixing tool and press down firmly on the clay.


10. This next step is totally optional, but to give the leather coasters a more weathered look, I rolled a wicker basket lightly over them all.

11. Pre-heat your oven to 130 degrees Celsius as per FIMO package instructions. Use a thermometer to regulate the temperate of the oven if you don’t already have one built in. Place the coasters on to a baking tray with baking paper .
Once you are happy with the temperature of the oven, put the FIMO clay inside to bake for 30 minutes. Make sure to open a window whilst the clay is baking to allow for ventilation.

To ensure the oven stays at 130 degrees use only one oven shelf (note: do not bake clay and food at the same time). Also do not bake for more than 30 mins.
12. Use an oven glove to remove the tray from the oven. Allow the clay to cool completely before lifting or touching. The coasters will look a little darker than before, but should remain flexible and elastic in texture.
13. Now for the finishing touches.
Thread the brown embroidery thread through a needle( doubling up) and use the blanket stitch to ‘sew’ the edges of the leather coasters (through the already made holes)

When you get to the end, knot the thread in place.
View this post on Instagram
Repeat for the rest of the coasters, changing thread colours if you want.

I’m really pleased with these leathers coasters! I mean, they really DO look like real leather – don’t you think?

***This post was sponsored by Staedtler UK. I received products and payment for my time creating this post. I only partner with brands I LOVE and think you will LOVE too! All ideas, photos and opinions are 100% my own.


This is definitely my new DIY project, better start shopping for these supplies
Good luck!
WONDERFUL IDEAS!!!!!
Thank you!