Hi there. Join Grillo Designs on Instagram and Pinterest to keep up with our latest posts and ideas. If you’re on Facebook, why not join our Kids Decor and Crafts group too – inspiration is guaranteed!
This post contains affiliate links for your convenience – please see full disclosure here)
My husband and I are quite hands on when it comes to decorating our home and it’s certainly rubbing off on my son. He loves to pretend that he is drilling holes or putting together furniture just like his dad! For EID (our Muslim religious holiday – which partly involves the giving of gifts ) we bought him a cute little Bosche toolset from eBay, and for weeks he just went around the house sticking plastic screws and nails into anything that resembled a hole! It was so cute to watch! With his matching builders hat
and belt
he really looked the part!
Well almost …. a tool bench was needed to finish the overall construction look and to help foster his interest in building further (and if in the future he wanted to start a business in woodworking and selling gorgeous handcrafted furniture, I think I could just about ‘bare it 😉 ). I decided to do a little internet surfing (aka window shopping) I found a few tool benches that were cute like this one and this
but nothing that really jumped out at me. Hey why not just make it, I thought – and if all else fails, abort mission and scroll through Pinterest dreaming of what might have been….
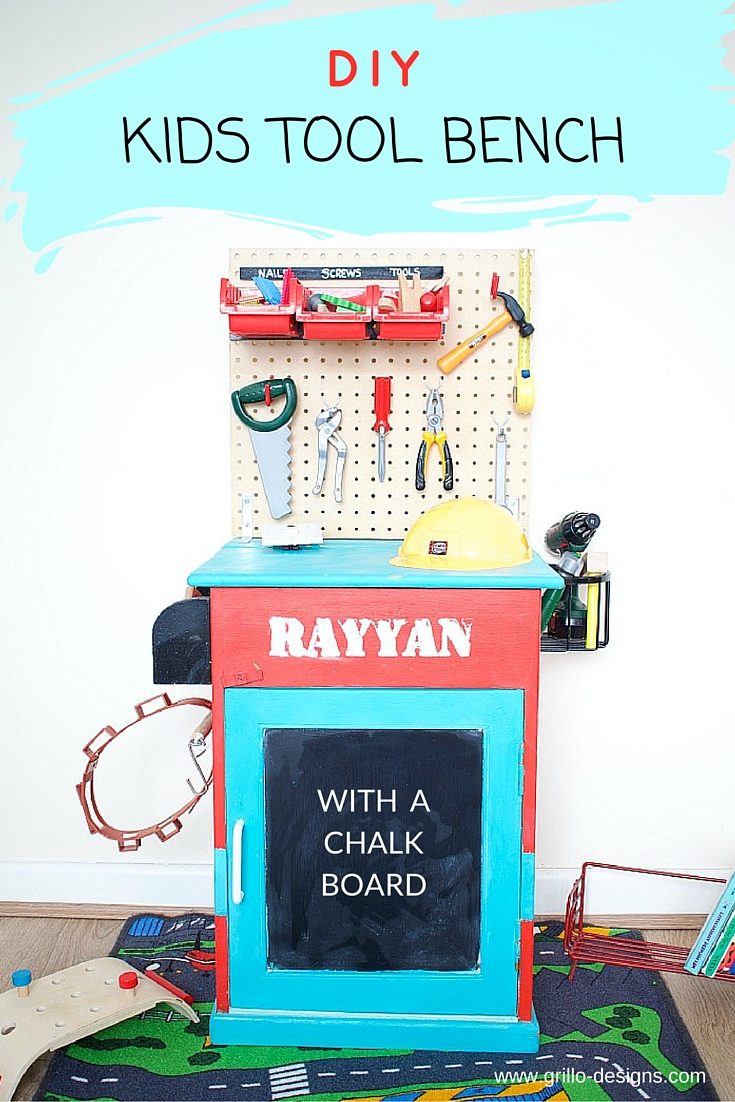
Here it is.
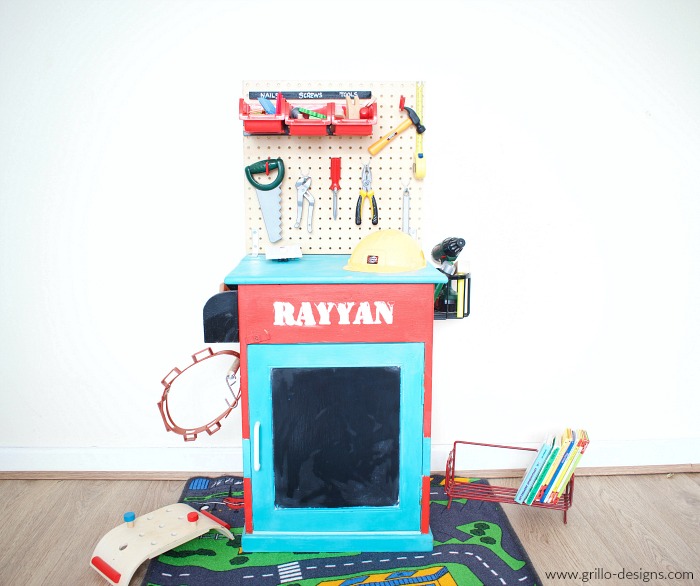
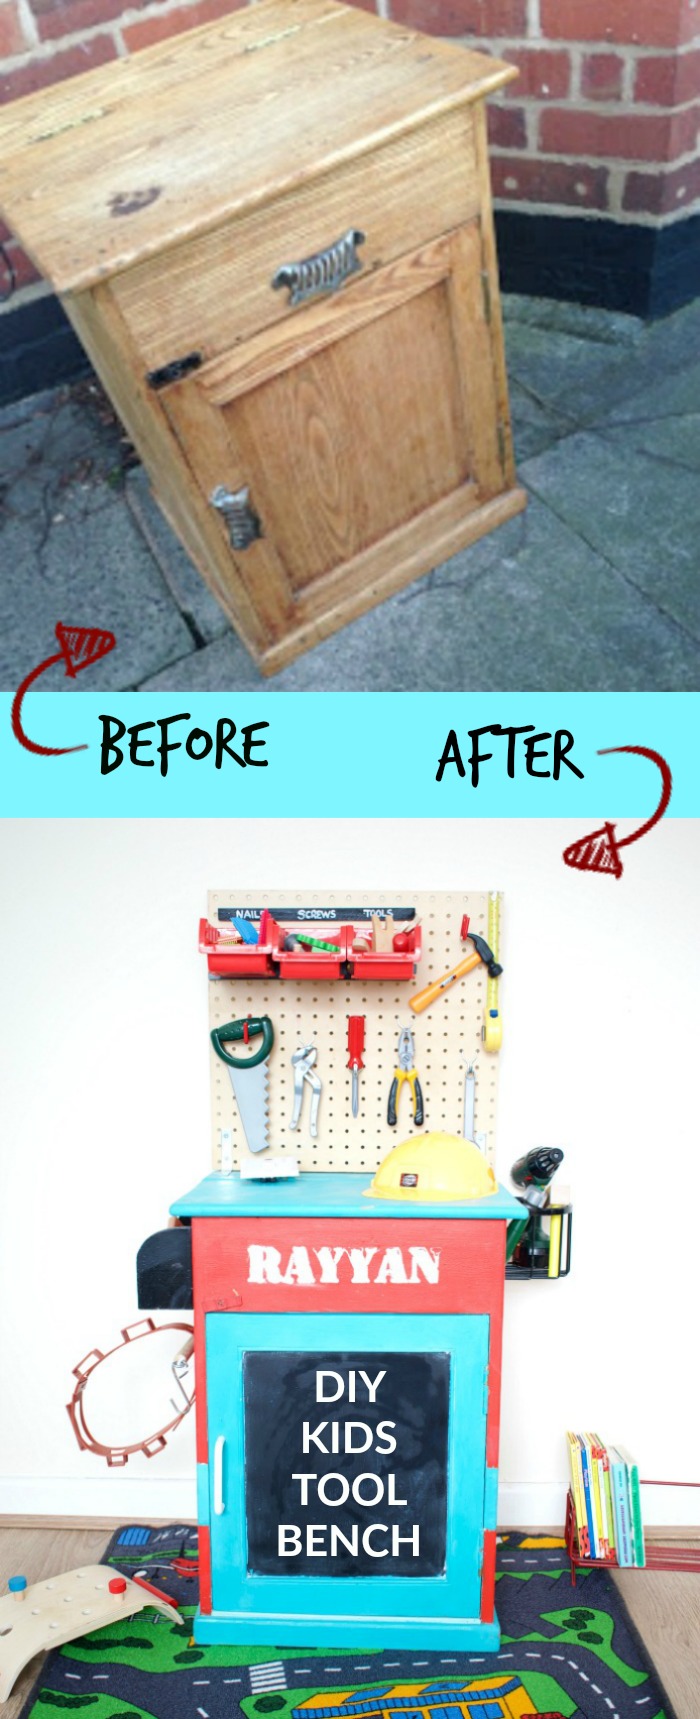
A DIY success for two reasons: 1. My son loved it and actually plays with it on a daily basis and 2. It didn’t hurt the wallet – at all. Because I didn’t build it from scratch and instead chose to upcycle an old cabinet, I saved money (are you noticing a trend with eBay here? Sorry it cant be helped, I just love that site!)
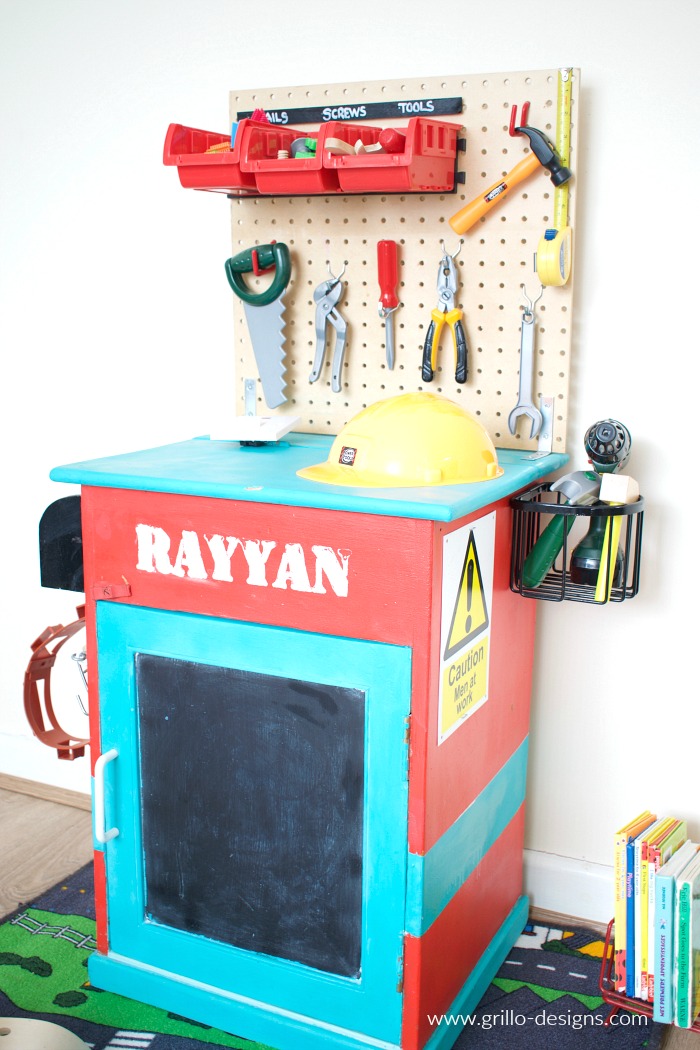
If you notice any knocks or scrapes in this photos its because this little thing is now almost 2 years old (post upcycle) and has a story of its own to tell!
Materials I used:
- Old wooden cabinet
- Wooden Peg board
- Mouse Sander
- L shaped/corner metal brackets
- Valspar emuslion paint (red)
- Valspar emulsion paint (light blue)
- Wickes (UK Store) emuslion wall paint (Boat House Lake)
- Foam roller and Paint Brush
- Wall tool box tubs
x 3
- Rustins Chalkboard paint
- Plastic kitchen door handle
- Clear interior indoor Varnish
- Customised stencil
- White acrylic paint
- Painters tape
How to:
Below is a ‘before’ picture of the cabinet I used. It definitely had seen better days, but it was perfect for what I had in mind. I cleaned it down then sanded with my mouse sander. I also removed all of the old antique knobs as they weren’t doing the cabinet any favors!
![image[3]](https://grillo-designs.com/wp-content/uploads/2015/10/image3-1.jpg)
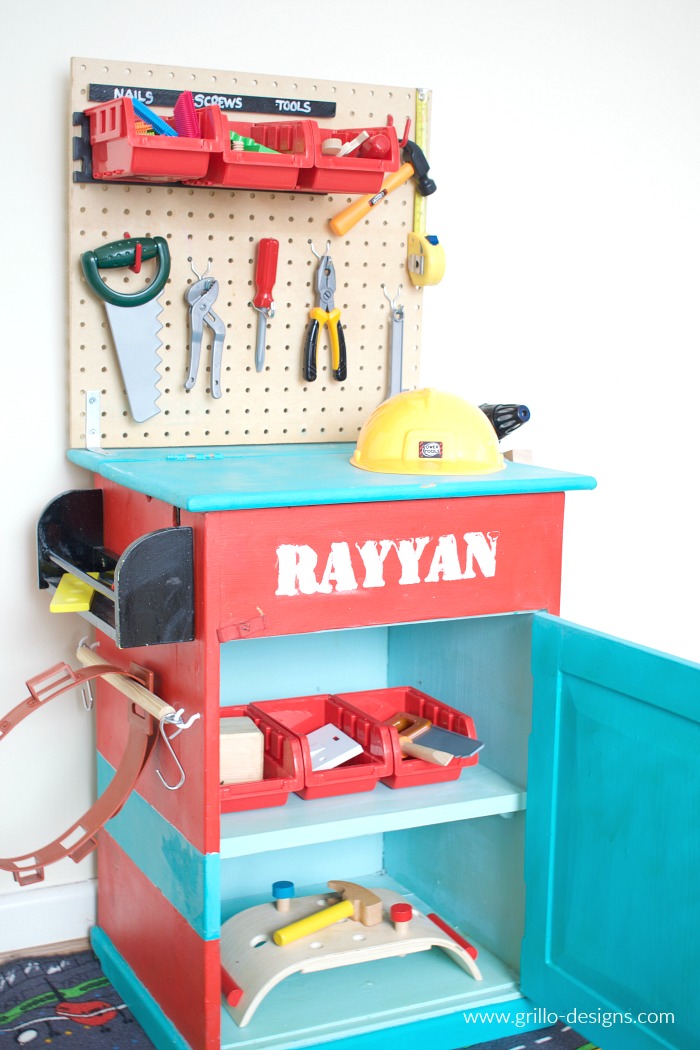
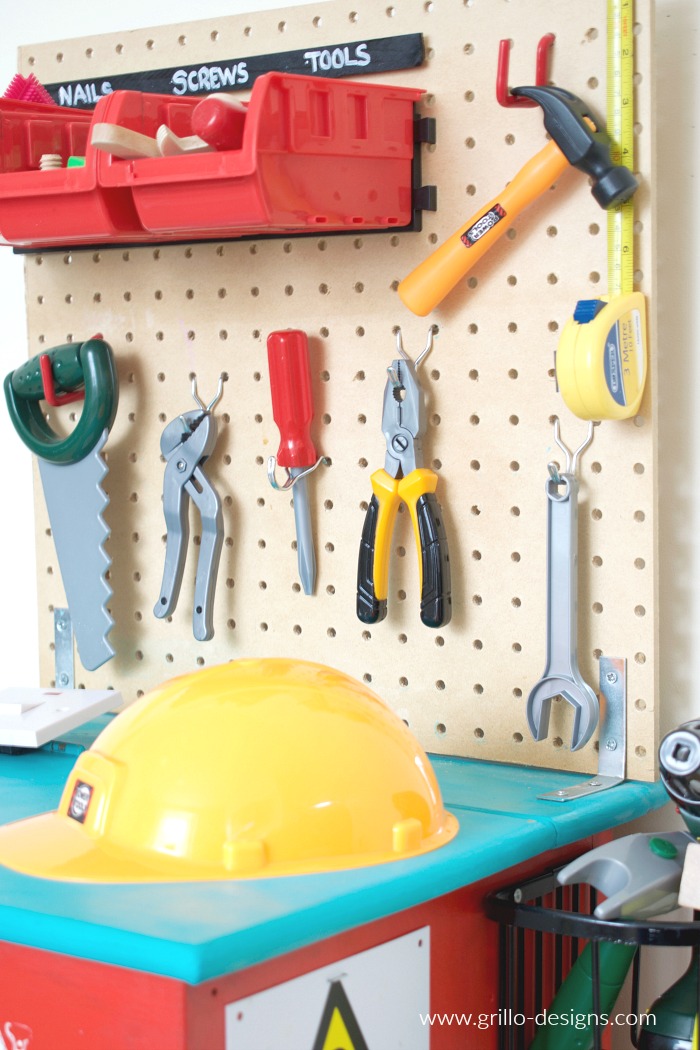
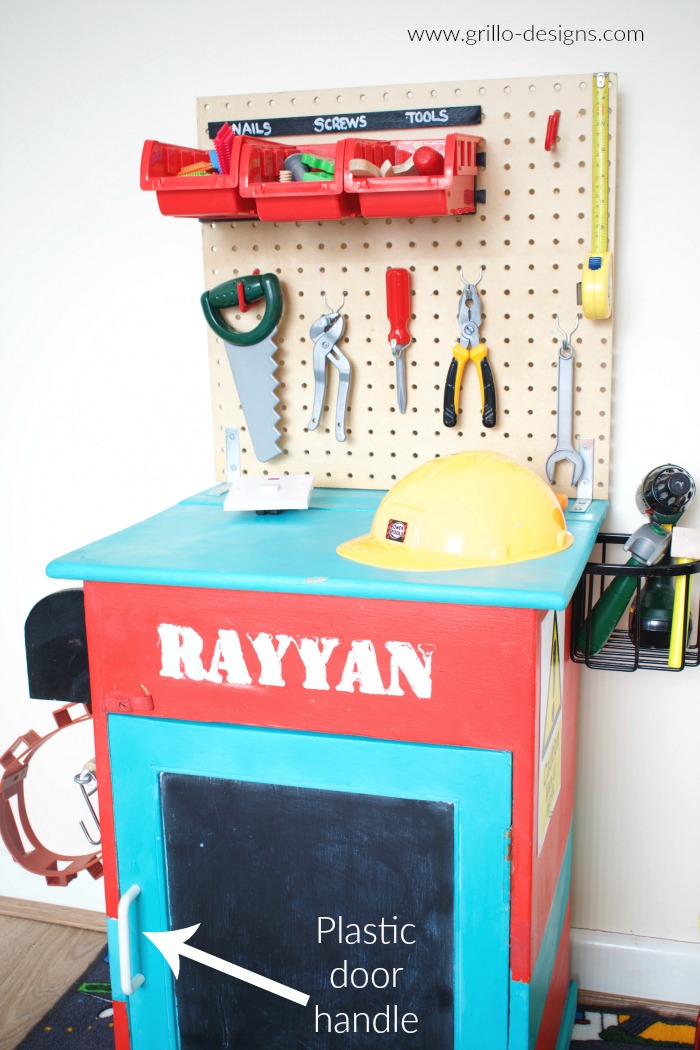
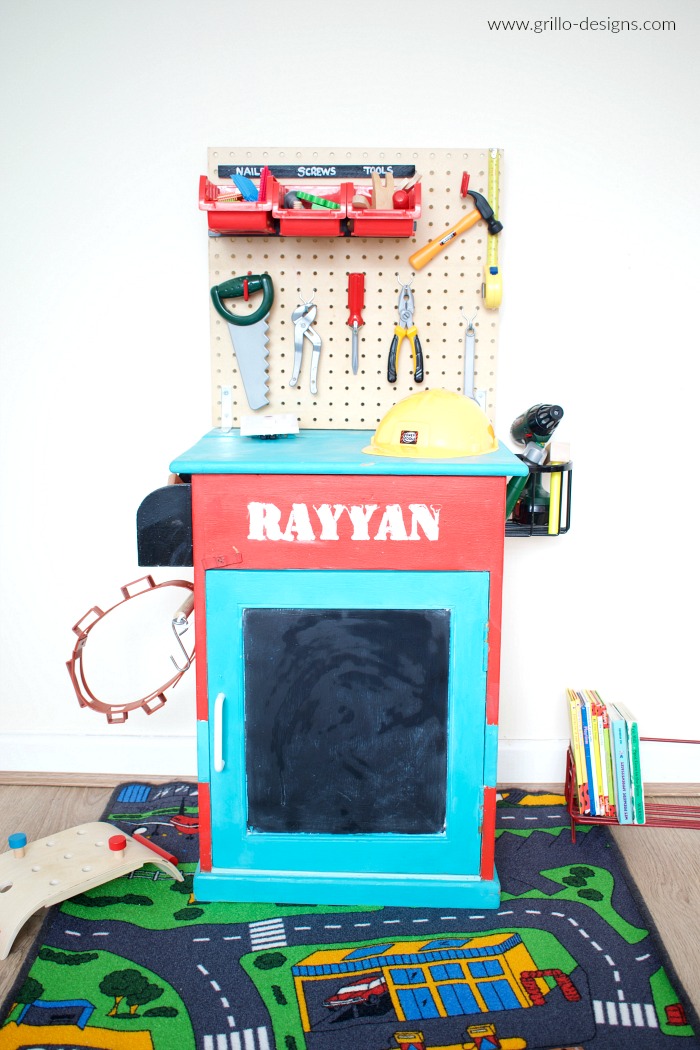
Next I painted with the Valspar paint (tester pots) using the foam roller to get a smooth finish (please excuse the mess in the photos). Valspar paint is great and easy to apply – it also has a built in primer which sometimes mean you can skip the under coat step. I watered the paint down ever so slightly and applied about three coats leaving 2 hours in between for drying time. Notice that the top part of the shelf pulls up to reveal a little storage area – I absolutely loved this!
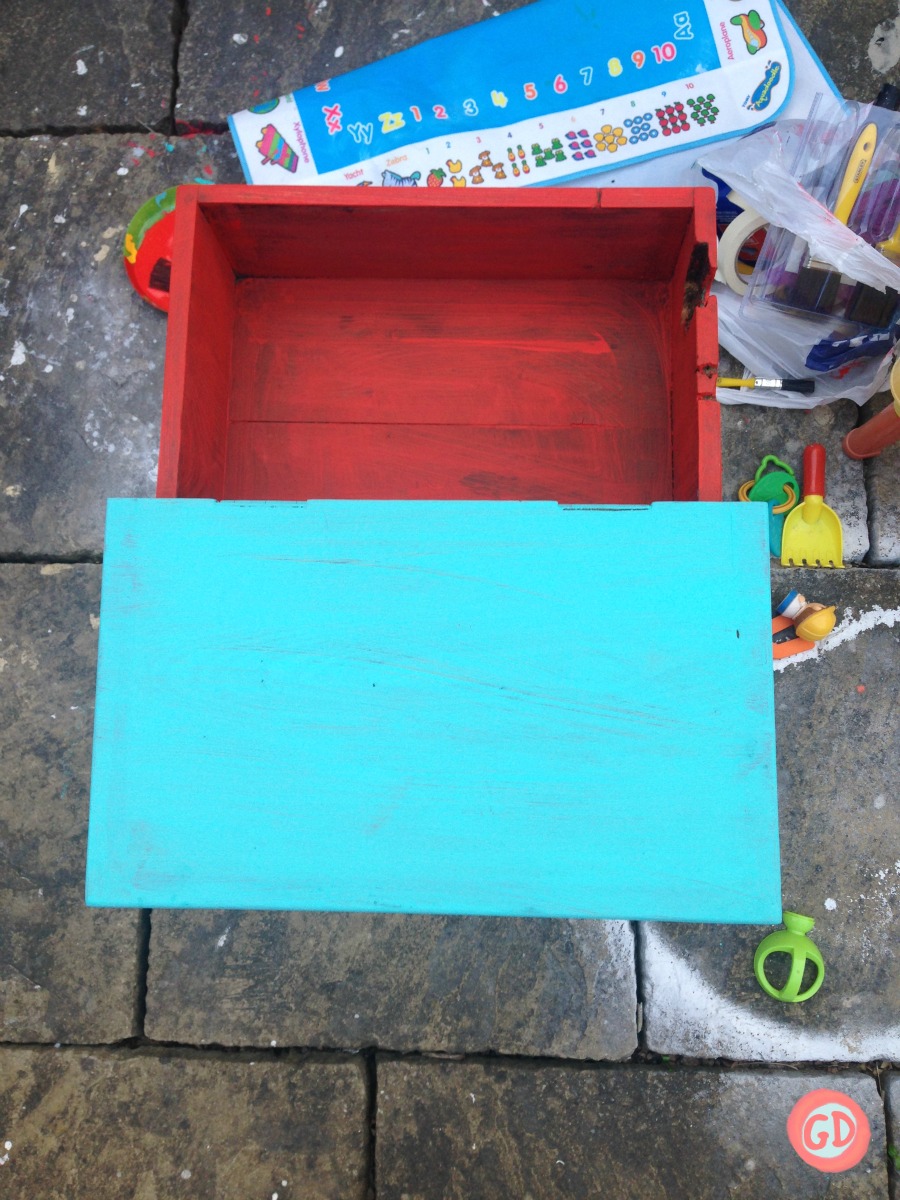
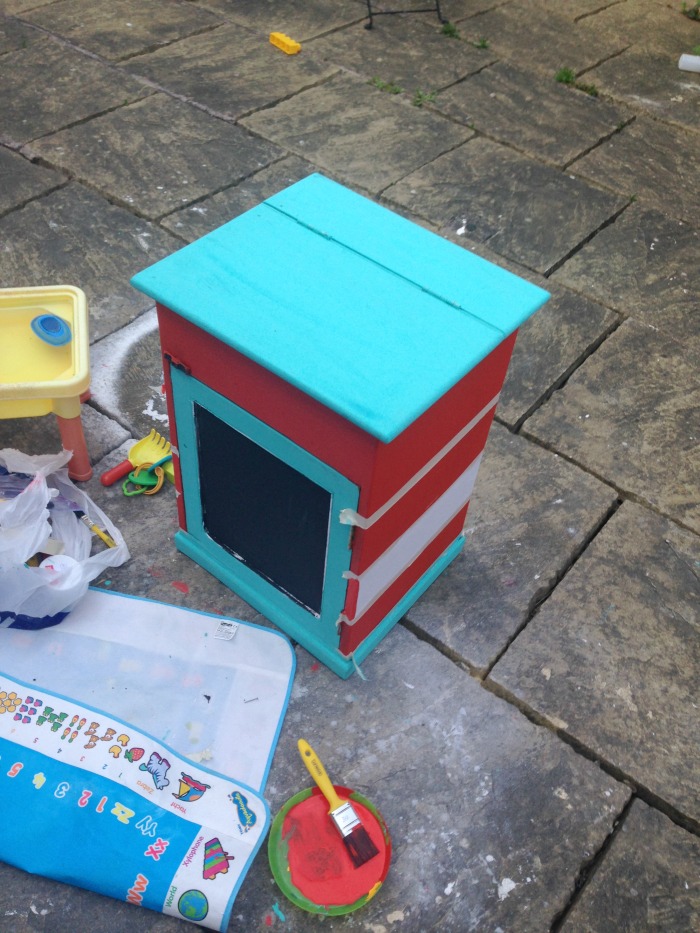
I painted the outside with the red and boathouse lake and the insides were painted with the Valspar light blue. I also added a chalkboard element to the door using the Rustins black board paint – because you can never have enough chalkboards!
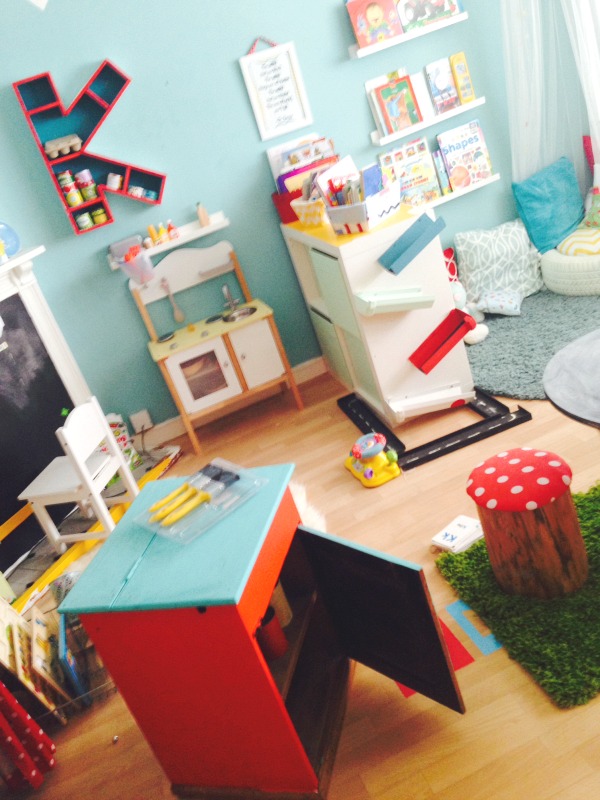
Once it was all dry, I brought it inside ( in typical UK style it started to rain) and it kinda just sat in the playroom for some time… amongst all the chaos in the room it really did fit right in!
A couple of days later (or maybe more) I got myself into action and finished it all off. I used a customised plastic stencil that I bought off eBay to initial my son’s name at the front. I used a white acrylic paint for this and a sponge to dab the paint on. Its meant to look a little faded and worn by the way ;). Everything was then sealed with three coats of varnish spray
Next: Attaching the 17mm hole peg board to cabinet. The hubby did this part. He sawed the 3.5mm peg board to a length that would fit the width of the cabinet ( the pegboard was slightly bigger than needed at 600 mm x 600mm) He then used the L shaped brackets to attach the board to the top of the cabinet.
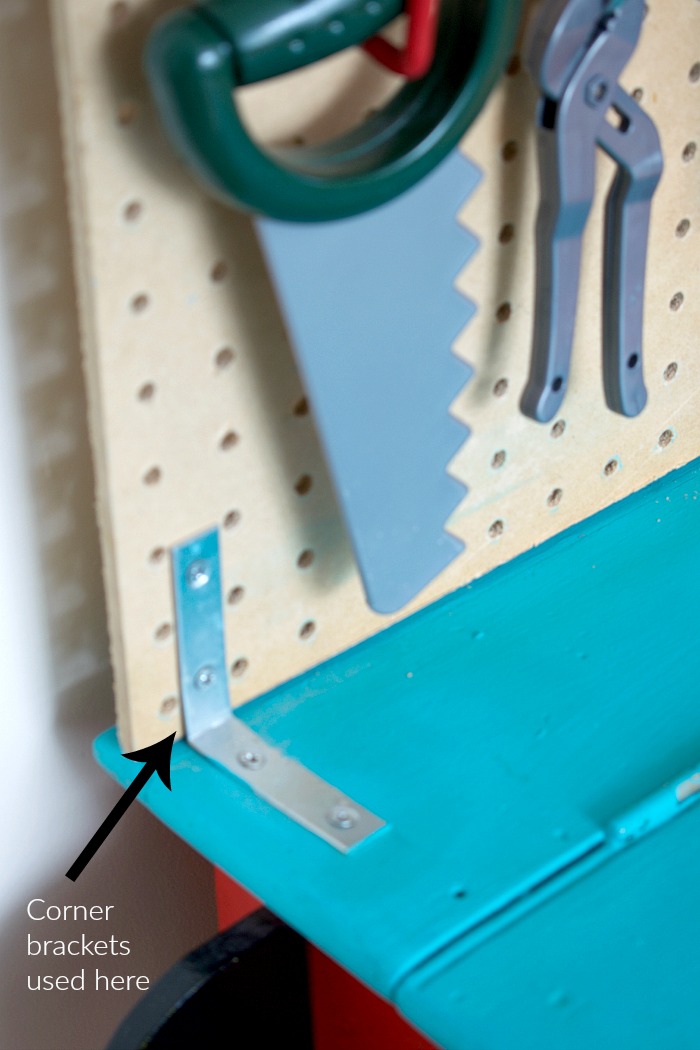
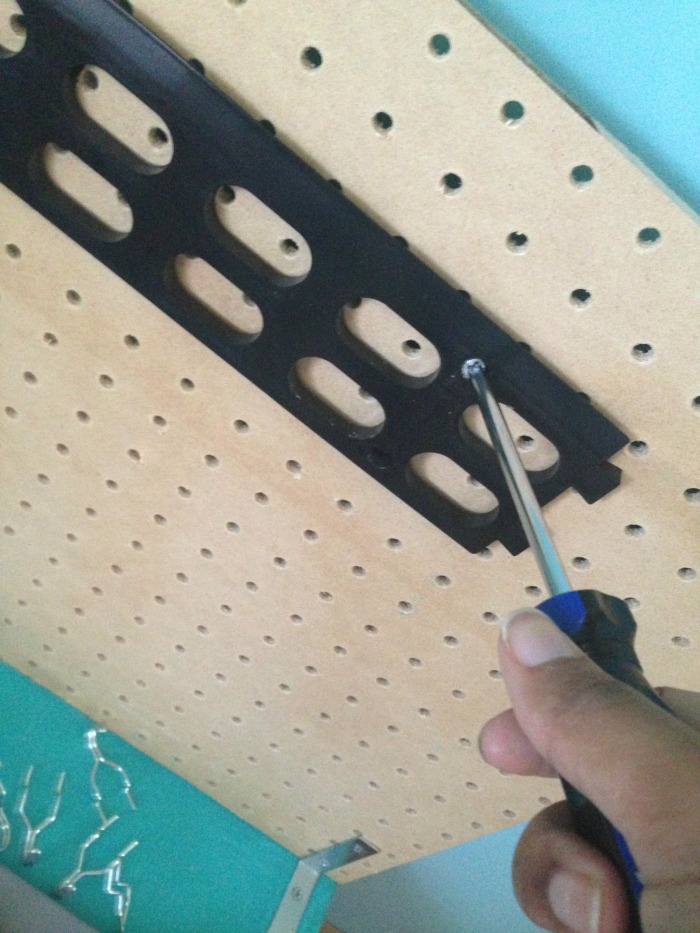
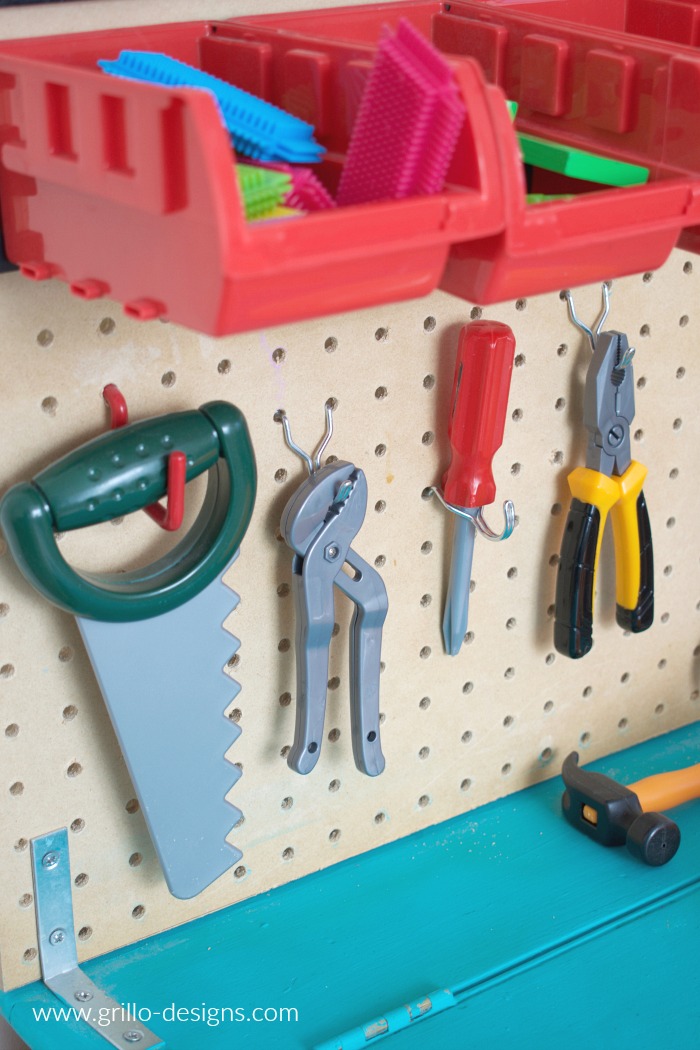
Once the pegboard was in place, I added on some accessories. I screwed in brackets for some plastic tubs and added on some pegboard hooks for his tools.
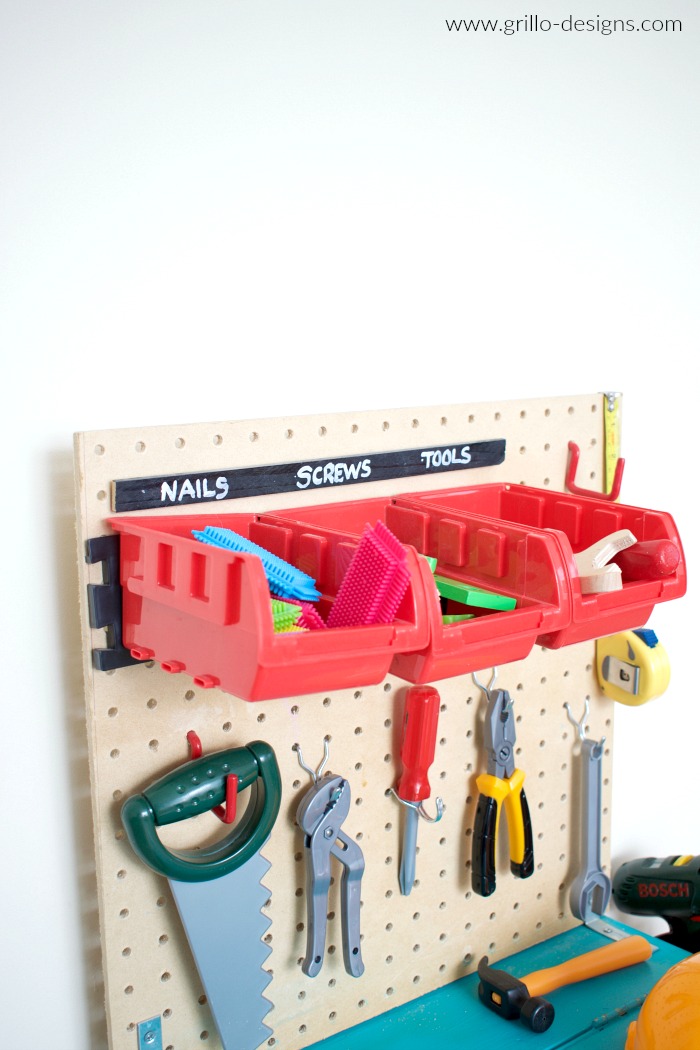
Remember those ugly door knobs I removed earlier? Well I replaced them with this white plastic handle – simple yet effective.
Should I just stop talking now and tell you where I got everything from? Here goes!
SOURCE LIST:
- Red plastic tubs – eBay
- 10″ Dowel rod – eBay
- CAUTION sign
- Wooden Tool set – eBay
- Tool Box
- Peg hooks – eBay
- Spice Rack – IKEA
- Car Rug – eBay
DONT FOGET TO PIN IT FOR LATER:
I would love to hear your thoughts, so please feel free to leave a comment below! Have you made anything for your kids recently? Also are you following my KIDS DECOR board on pinterest? If not click here.
This tutorial was also featured on TEACHER BY TRADE, MOTHER BY NATURE as a guest post.
OTHER POSTS YOU MIGHT LIKE:


Just completed my version of this for my Grandson using an old kids kitchen unit and so chuffed with the end result!
I have a new project idea! My on looves all sorts of tools 🙂
Well, I have tool touch and I use it for my constructional work. This is a perfect tool bench for the little one. Most important part of this article is I have both tools and kids. They love to play with it and try to make some project that is great. Waiting for next article. Thank you so much.
Haha that made me laugh. Im glad you like the tool bench! Thanks for stopping by 🙂
[…] DIY Kids Tool Bench | If you have an old night-stand sitting around, this DIY kids tool bench is the perfect homemade […]
What a perfect little tool bench for your little one! This is an awesome repurpose of an old cabinet.
Love this and what a superb idea – my twins would just love this 🙂 Thanks so much for linking up, love Jess xx
#HomeEtc
Aaah such a sweet idea — my boys would absolutely love it! Thanks so much for linking up with us, Caro #HomeEtc
Just dropping by to let you know that your awesome DIY is a featured pick at the Merry Monday Link Party #106! Thanks for sharing with us. We’d love to have you link up again this week. 🙂
Thank you so much 🙂
[…] pick: DIY Kids Tool Bench @Grillo Designs (PIN […]
[…] DIY Kids Tool Bench – 21st May 2016 […]
What a cretive idea. I bet the kids will love this.
This is GREAT! And I have an old nightstand that would be perfect. I am getting my husband to make one of these for my son! Thank you for the inspiration.
[…] Click HERE for the instructions […]
This is the coolest ever!! My husband is a mechanic and my son is 20 months old, just getting into tools and what not. He would love this! And with another little guy on the way, I know it would get a lot of love and use!
Congrats on your pregnancy! And thank you – I think any little boy who likes to fix things will love this 🙂
This would make the perfect gift (I love homemade gifts) for any little boy or girl! Great work!