Organise your desk space with this DIY pencil holder – made upcycled red bricks!

[Psst! Join me on Instagram and Pinterest to keep up with my latest posts and ideas. Got a question? Join the discussion in the new HOME & DIY chat forums and don’t forget to SUBSCRIBE TO THE BLOG for more awesome DIY ideas!]
………………………..
Have you ever walked into a shop and seen something that immediately catches your eye? Then, find yourself unable to leave without buying that something because you truly believe in love at first sight?
Well this happens to me a lot… more times than I can count actually!
I’ll just be strolling quite happily through the shop aisles (it’s really crucial that I add here that the only places I happily stroll through are either the hardware or home decor store) when I spot something that makes the wheels in my head start turning real fast …
I mean, faster than normal because let’s face it, when are those wheels ever not turning?
That’s another rhetorical question by the way.
So I saw these bricks… yes there are the very ones.

Fell in love, immediately thought ‘hey these would make great pencil holders for my desk’ and the rest, as they say, is history. In other words, they’ve been given an Upcycled Grillo Makeover.

At the time, it didn’t matter that the cashier guy was giving me weird looks… like ‘she’s just gonna buy two bricks?? Really… oh o-kay’.
Or that passerbys’ shot me even weirder sideways glances as I made my way to the parked car with these two bricks held tightly in my hand
I just didn’t care. Firstly, because when I get a new idea, nothing else really matters and all rational emotions like say, embarrassment, awkwardness, or even mortification are strangely not present. And secondly, what else did they want me to do… carry the bricks in my bag??
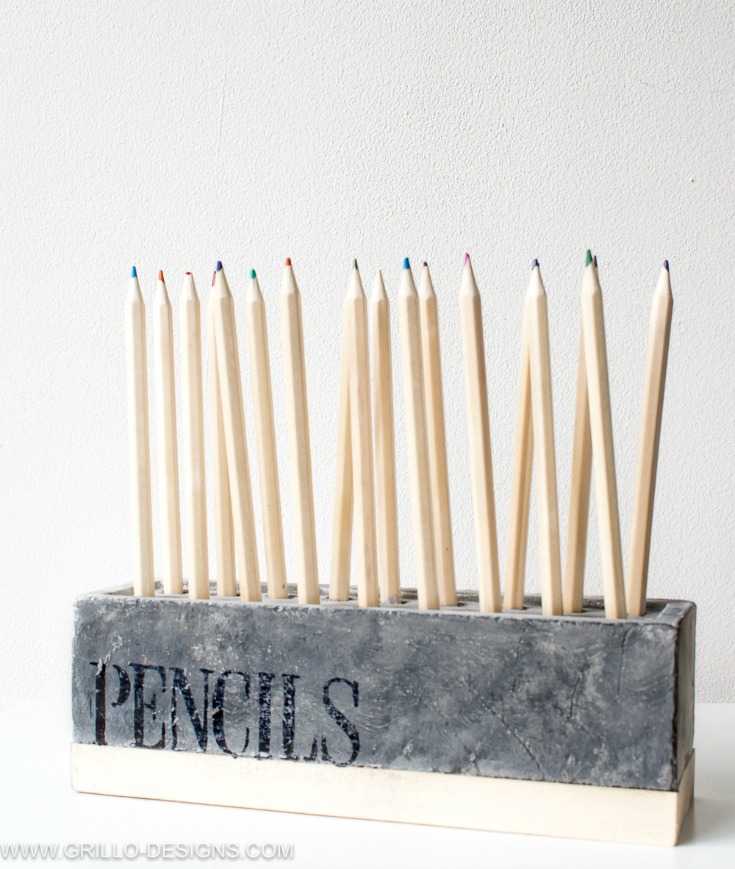
HOW TO TURN A BRICK INTO A DIY PENCIL HOLDER:
Paint the brick.
The end.
No I’m just kidding, there was a little more to it than that . Promise!
1. Using a paint brush, I painted on two coats of white primer paint.

2.Then I painted over the primer with a flat light grey emulsion (latex) paint. You can use any brand you like for this part.

3. I noticed those yucky paint strokes once it had all dried. To get rid of this look, I started dabbing on white paint using the end of my brush. You can mix the white up with darker shades of grey if you like. Keep on dabbing until you are happy!

By the way, is this sounding familiar? It’s the same technique I used for my faux metal letters, except that time I was going for a more shimmery look. This time I wanted more of a concrete effect hence the lack of shiny and shimmery paints.
4.I then added a raw piece of wood to the underside of the brick with liquid nails glue – so the pencils wouldn’t fall out the other side. I left this to dry overnight.

5. I also rubbed chalk over the entire pencil holder to give a chalky type effect then smudged it in with my finger.

6. And finally, I stencilled on some letters (optional) with a sharpie pen. I sanded it back with sanding paper to make the words look a little aged and distressed

And thats it! No need to seal if you want to keep that chalky look. How’s that for an upcycle?

I’m going to attempt to read your mind now and answer a few of those questions I know you’re just dying to ask me, like

What’s the name of this brick – I noticed it has square holes?
It called an air brick!
How do I make the holes if I have a regular brick ?
Good question. You can use a drill sized at least 7/16 to make holes!
Can I make a similar pencil holder with concrete or wood?
You sure can! Heres a great tutorial on how to make a DIY pencil holder from wood and here’s another tutorial using concrete
Could I not just buy a cinder brick and do this rather than painting it to look like one ?
You could, but those things are huge!! Can you imagine the looks I would have gotten lugging that to the car!


HOW TO MAKE A DIY PENCIL PICTURE FRAME


HOW TO MAKE HYPERTUFA PLANTERS

HOW TO MAKE A UTENSIL ORGANIZER


Home and DIY
Organizing
Cleaning
Crafting
Introduce yourself!
This is genius and adorable and artistic all rolled into one. I wish our bricks came with holes in them, I might have to go searching 🙂
I would never have thought of using bricks this way, love the idea! 🙂
This is so cool! I saw your project was a reader’s favorite on Pink Heels Pink Truck link-up and no wonder, this pencil holder is awesome! And I def know what you’re talking about when people give you the side eye in stores, in my head I’m just like I’m about to make something awesome with this lol. Thanks for sharing, enjoy your week!
Love how this turned out! So uniquely cool! Thanks for sharing with us at Snickerdoodle! Pinning to share.
Thank you so much!
Love it and great to meet you on craft schooling Sunday, hope to see you again!
Thanks for having me!
This is so so cool!! Love how you stenciled on them too… and the color is just perfect!!
You are so clever!!
This is so freeking cool, the fact that it is so simple makes it a fantastic idea. Love the stenciling details too! This is the sort of thing you’d find in a shop like urban outfitters. I’m off to B&Q over the weekend to buy a brick I think I can cope with the strange looks.
Hehe claire!