How To Paint IKEA Furniture
I love IKEA …..LOVE!! I mean, who doesn’t right? Most of their popular on-budget furniture pieces like the LACK, KALLAX, MALM, BILLY(sorry nerd alert!) have such huge potential for customisation, its unreal!
The process of repurposing or updating IKEA furniture, also known widely as ‘IKEA Hacking’, is quite the craze these days (hence the birth of the IKEA Hackers website). There are lots of different ways to achieve a hack – but the simplest method of all and my favourite, is just to paint IKEA furniture.
IKEA furniture can be tricky to paint at times, especially the laminate coated pieces, but when done the right way, can make such a huge difference (you can see for yourself by viewing some of my IKEA projects here).
Today, I am sharing how I paint IKEA furniture in 5 easy to do steps. Disclaimer: I am by no means a painting expert, but like to think a few years of hacking has taught me something!

How to paint IKEA furniture
This post contains affiliate links for your IKEA hacking convenience – please see full disclosure here
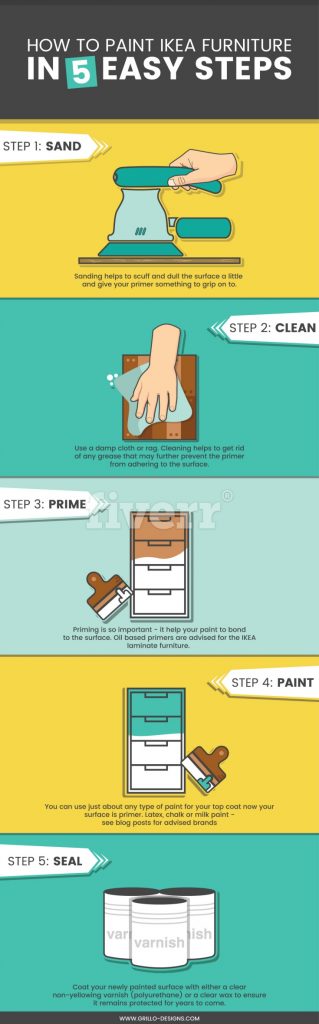
STEP 1: SAND
Most IKEA furniture, have a laminate wax type coating that makes it difficult for paint to stick effectively to its surface. I know it may be a controversial choice, but I ALWAYS sand as part of my prepping routine . In my opinion, the sanding process just helps to scuff and dull the surface a little, giving the primer something to grip on to.
RELATED ARTICLE: HOW TO PAINT MELAMINE CUPBOARDS

You can either sand by hand with a 150 grit sander or use an electric sander ( I love using the Black and Decker sander personally, but I hear the Boshe Orbital Sander is also very good).
STEP 2: CLEAN
I don’t always stress the importance of this in my painting tutorials but cleaning after sanding is a must! I usually dust off with a damp cloth and then I like to use this (or TSP) to give it a more thorough clean. Cleaning this way just helps to get rid of any grease that may further prevent the primer from adhering to the surface.
STEP 3: PRIME
Always prime (this will help the paint to bond to the surface) and if its the laminate effect IKEA pieces you are painting, then it needs to be an oil based primer . NOTE: Oil paint primer needs to be applied in a WELL ventilated area as fumes are quite strong!
I like to use cheap foam brushes to apply primer to avoid brush marks. I’d like to add here that sometimes I do get away with just using spray on primer applied in very thin layers s…as long as it doesn’t scratch off once dry… you’re on to a good start!

It’s important to note that the key to good priming is allowing the primer paint to cure the required amount of time as stated on the product manufactory details so don’t forget to look at the package. PAINT PRIMERS TO USE : Rustins, Zinsser, Rustoleum
STEP 4: PAINT
Now that you have primed your surface like a pro – you can use just about any type of paint (latex, milk or chalk ) for your top coat. Personally I like to use latex (emulsion) paint as I find it more cost effective than chalk paint. I also love the easy coverage and application of it.

My favourite latex brands to use are Valspar, or Wickes, but sometimes I may use Rustins blackboard paint if I want a chalky finish. I usually apply 2 -3 coats of paint depending on the look I’m going for and always use a foam roller (but you can also use a paint brush or spray it on with a paint sprayer)
STEP 5: SEAL
This is, I think the most important part of the whole process.
Coating your newly painted surface with either a clear non-yellowing varnish (polyurethane) or a clear wax ensures it remains protected for years to come. If you plan on using your furniture in a high traffic area, then using a Varnish/polyurethane may work out better in the long run.
(I had used wax to seal my sons DIY under bed toy box, but maybe using a varnish might have been smarter as it now has a few knocks and scrapes)

If you do choose to use wax as a sealant, ensure you are using a wax brush or cloth to apply it and also that you are leaving it the recommended amount of time to cure (normally about 24hrs). When applying polyurethane a good quality paint brush is enough, but again it needs to be left to dry before applying further coats.
Since I’ve been using progress pictures from my previous IKEA HACK post where I transformed a standard white KALLAX into a cool looking industrial piece for my son – I think it only fair to share the final picture! What do you think?

And that its guys…. everything I know about painting IKEA furniture. Not too complicated I hope? Do you think this post has given you the confidence to tackle your own IKEA piece?


HERE ARE SOME BEFORE AND AFTERS OF IKEA PROJECTS I’VE TACKLED:


AND HERE IS ONE FROM OUR MEMBERS

DIY FABRIC BOOK SLINGNS (IKEA HACK)
Why when I have used a sealer an chalk paint , paint is scratching off
This was the first save in my ‘2021’ bookmark folder.
Cheers!
You’re welcome!
how long did you cure the paint between all the steps and before use?
Can this apply for IKEA kitchen cupboards too? How do you know if it’s the “laminate effect” type of surface? You mentioned it needs a particular oil-based primer.
Yes! A great primer is Zinnser – you must try that!
Hi
This is really helpful info thanks. We’re doing a Billy hack to make bookshelves in our kitchen. We used a primer then Matt emulsion paint, which looks great. We started painting on a water based matt varnish and have really visible brush marks. Do you have any tips to avoid this happening?
Thanks,
Jenni
SO glad you found this helpful! Did you know you could use a varnish sponge or foam roller to paint on your varnish ? It works just as well 🙂
Great post. We painted our IKEA kitchen cabinets using a very similar process, though we sprayed instead of roller’d. Agree that the primer is the key and BIN is excellent.
Here is our painting project if you are interested:
http://shirleyandchris.net/blog/2017/05/15/diy-painting-ikea-kitchen-cabinets/
Wow I love what you have done – looks amazing!
This is really helpful. Thank you! I love the gray and orange paint you used. What are they?
Glad you like it! The gray is a chalk paint and the orange is dulux gloss range
Thank you for sharing all your tips! You have some beautiful projects. I have a hand me down white Malm bed that I’d wanted to add some small stencils to for my daughter’s room. From everything I’ve read it doesn’t look like I’m going to be able to paint stencils on without sanding, and priming the whole headboard. That will probably mean repainting the whole thing as well since I imagine exposed primer won’t look particularly good. Any ideas on how to make painting just a small part work or am I just going to have to bite it and paint the entire bed?
Thanks so much. I would advise a light sanding UNLESS you are using chalkpaint to stencil 🙂 Chalk paint works great on most materials
Can’t believe i’ve only just found this blog post of yours – I painted some IKEA bookshelves about a year ago and this article would have come in mighty useful!! Know I now where to come for my IKEA hacks! x
Ahh I’m glad you found this post useful!
Hi,
If I follow your steps of sanding and priming my billy bookcase, do you think I can spray paint it instead of paint? And if so, would you still recommend a sealer on top? Many thanks!
Yes you can do that- but I would still recommend a sealer on top so it doesn’t scratch off!
Hello
Can I ask you if we can avoid the sanding step?
I’m looking fro something fast & easy
Thanks
Hi Ilham, I wouldn’t advise it really especially if it a laminate piece of furniture. If you do avoid this step, then you need to make sure you are using a really good primer i.e ZINSSER
Hi we painted our ikea billy bookshelves, two layers of undercoat and 1 coat dulux satinwood in a grey colour in top, both oil based. The paint is scratching and chipping easily. I was going to put the ronseal varnish as you recommended on top but i was told not to put a water based varnish on top of oil based paint. I found an oil based varnish but now Im not sure which one to use? Any ideas? Thanks
Hi Rina, can I ask what brand undercoat you used? That is really the most important part… there is not point in sealing if the paint is already scratching already.
Hi There Name sake!!
I really would like to revamp the IKEA play kitchen (DUKTIG) but I really don’t know how to go about it. Any suggestions would be greatly appreciated.
Thanks for sharing all your amazing ideas.
Hi there Name sake!!!
I really would like to revamp the ikea play kitchen (
Hi! Do you recommend taking the IKEA furniture apart first or just painting it already assembled?Thanks!
You can do either or. However im thinking painting before you assemble might be easier~!
Hello there, I want to paint ikea Heri corner unit in o dark color. It is birch color origianlly.(please google, I am unable to paste the picture here). I heard that this piece is going to swell if I tried to paint it and ikea pieces are hard to finish. Any recommendations! Thanks a ton
Pooja, follow the exact same steps in this article and you cant go wrong!
Hi! Thank you for the instructions. I have a quick question.. so it was our first time putting together IKEA furniture and by accident an unfinished side ended up facing outwards. It is underneath the drawers so it’s really no big deal to paint as it won’t be very noticeable.. but what would you suggest to do? Would we have to sand it down? And what primer & type of paint would you recommend for it? It’s not very rough-feeling, but obviously not as smooth as the rest of the piece
If the drawer shelf itself is not noticeable I prob wouldn’t paint it, but could you please tell me what piece of IKEA furniture it is before I give any recommendations ? thanks 🙂
It’s the IKEA malm side table (2 drawers) in black brown! It’s the part underneath the second drawers right now it’s like the birch color because of the misplacement. I think we would be more comfortable if it was painted so any suggestions would be helpful, thank you ?
This is great!! Thanks. I have an iKea piece to paint as well. However, I was thinking of staining it. Have you ever used stain on any of ikea laminate type piece? Do you think it will take the stain?? Thanks.
Thanks Anjuli. Unfortunately stains do not work well on laminate as there is nothing for it to soak into. Stains work the best on untreated raw woods for example like the ikea wood spice racks. For laminate the best way to change the look would be to paint
What do you recommend for painting a baby’shower crib? Should I sand it if it is the natural sniglar? Thanks
Yes give it a quick sand if you can. It really is always a good idea to sand beforehand. I know it can be time consuming but it pays off in the end 🙂
Thank you so much for the tutorial on painting IKEA furniture! Really good instructions!
You are most welcome! Glad you found it helpful!
Thanks for this post!! We’re moving shortly and I need a pantry for the kitchen, so I am researching Billy bookcases with doors. I don’t like the finishes and am definitely going to paint. I am leaning toward chalk paint, but had some reservations about the finish it would produce on the laminate. After reading your article, I got me some TCP and am going to use latex. Do you think I should I use flat with satin polyurethane? Do you think I could use flat/flat and wax on top?
Thanks
Dolores
Good luck with your move. We have just moved homes so I know how stressful it can be! Latex is always my choice as it is so much cheaper. I would definitely go with a polyutherane rather than wax if you are going to be putting this in your kitchen…. a flat satin is fine if you dont want a shine on it. But if you want a more glossy look, a gloss effect polyutherane will work for that. Just ensure you are using a non-yellowing poly so it doesn’t change color over time. Hope that helps!
I seriously need to try this! I’ve only ever painted one piece of furniture (and it didn’t turn out that well lol) so I desperately need this tutorial. Pinning for future reference. Thanks, Medina! 🙂
You are most welcome Emily 🙂
This little industrial bookshelf is a killer! I love it! And I also love hacking IKEA and IKEA-like pieces, but I HATE that darn wax they all have. I follow the same steps you recommend but sometimes not even that is enough for the paint to stick to it. Maybe I should wait a little longer after priming it. Will try next time!