A mid century dresser makeover ‘tutorial’ sharing the 5 basic steps on how to refinish and upcycle vintage furniture. In support of the Emmaus UK charity for National Recycling week.

You, know that saying ‘Fake it to you make it?’
That would be this tutorial.
Although, it pains me to admit it. Of course it does.
I’m meant to be the girl who knows all there is to know about DIY (laugh), the girl with the creative ideas and blog… surely for the most part, if I’m writing a tutorial I should know what I’m talking about …. Right?
Right. That wasn’t a trick question by the way.
Well not this time. This time I had no clue.

What I know about refinishing furniture? Not much, as it happens.
I still gave it a try though… for a good cause..
Que the Emmaus UK Upcycle Challenge!
About a mouth ago I was contacted by Emmaus UK (a charity that supports homeless people) asking if I wanted to take part in an upcycling challenge they were hosting? It would be a way to highlight the importance of recycling and upcycling during National Recycling week.
Is it disgusting to say that I had never heard of National Recycle Week up until that point..?
Yes, ok it’s disgusting (being an upcycler and all). But never mind that, I jumped at what sounded like such a fun idea. YES!, I replied, I’m in!
The challenge: make something bespoke out of an item chosen from an Emmaus charity shop. You can read the full press release and see what all the other bloggers did here
WHY A MID CENTURY DRESSER MAKEOVER?
Following the email, I made my way over to my local Emmaus charity store fairly quickly. When its comes to shopping in the name of upcycling, I dont procrastinae!

On arriving at the shop, I was amazed by all the stunning pieces of furniture that greeted me (oh the staff were lovely too haha)! I was in upcycle heaven! it was all I could do to try and keep my head from spinning (all exorcist like) and choose just one thing!

In the end though it was this mid-century dresser, stacked high with used toys that stole my heart.

Oh I fell …. hard!
I took the dresser home and dreamt up all these fabulous ways I would paint and make it look even better.
Until I realised slapping a whole load of paint over it really wouldn’t made it better at all (Ok a little white lie there, I had a little help with this epiphany from my readers) .
This old thing needed a makeover not a cover up.

So back to the blind leading the blind statement above…
I totally winged this mid century dresser makeover… I also didn’t take many progress pictures (sorry bad blogger moment) because it was my first time doing something like this and I’d imagined it would be a total disaster.
Disasters aren’t usually too fun to read about.
Well thats what I told myself, yet here I am now..
About to talk you though steps on how to refinish a mid-century dresser…
Oh what a funny world we live in.
This tutorial contains affiliate links for your convenience – please see full disclosure here
STEP ONE:
After the initial inspection I concluded the dresser was in generally good shape. No damaged or missing veneer to be seen. FYI: if there had been areas that had needed repairing, here is an easy tutorial from one of my painting guru contributors on how to fix this.
STEP TWO:
I cleaned the dresser with window cleaner to remove any dirt or grease.

STEP THREE:
I removed the hardware from the drawers and sanded the whole unit down with my palm sander. The veneer on this dressers wasn’t too thick, so I was able to use medium grit sand paper on my sanding machine.
I sanded the legs separately with paper alone to ensure I got in all the nooks and crannies. Finally, I removed all the dust with a wet paper towel and cleaned again.

Initially I had just planned to stencil the bottom drawer with some Scandi half circle shapes and seal everything with clear poly. .
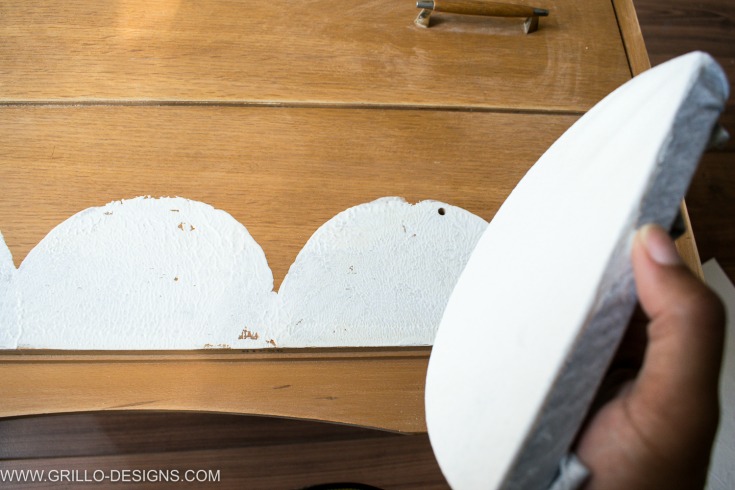
Yeah…. no.
It didn’t turn out at all like I envisioned. . Maybe if it were going in a child’s nursery perhaps, I might have liked it better?

I was forced to create a plan B.
But first I had to sand all the paint off again [insert eye roll]
STEP FOUR:
When it comes to adding colour to wooden pieces, I’m usually all for dark stains . One of my favourites I like to use is Dark Oak varnish by Ronseal. However, on this occasion I found myself opening a can of dark wax from my supply cupboard. The brand I used was Rustoleum but if you’re in the US, this will do!
Using a wax brush, I brushed on the dark wax to small sections of the dresser, and then quickly removed the excess with a rag . Here is another tutorial that really helped with this step as this was my first time using dark wax.

I really liked how it looked so I kept going! Once finished, I left the wax to cure overnight.
Be warned – this stuff stinks bad! Make sure when applying wax you are doing so in a well ventilated area!
STEP FIVE:
I decided to add a little touch of Rustoleum white chalk paint to the last drawer for some added character. FYI: You can make your own chalky paint if you’re feeling brave – heres how!

I used a dry brush technique to do this. Dry brushing is when you lightly brush over the piece with very little paint on your brush. You dip your brush then vigorously brush off most of the paint on a piece of scrap paper or tissue.
Rather than dab, I applied the paint in quick upward motions across the bottom of the dresser to give this ombre effect.

You could probably add in a few more colours if you wanted for a more authentic look, but like I said, I’m no professional.
So I kept it simple.
Here is the dresser in my bedroom as a bed side table (I placed the previous IKEA stool table on the other side of the bed)


My husband actually wasn’t a huge fan of this mid century dresser makeover initially, but it seems to be growing on him now! Thankfully it was well received on instagram!
Now that wasn’t such a bad tutorial was it?
I mean you can always tweak a few things if you like, and of course if you have any questions about anything you can leave me a comment below!

[Sources: Flower Printable – Woody and Florence, ‘I carried a watermelon’ print – Nickiekelly.com
I’ve really enjoyed this upcycle challenge with Emmaus UK. I urge you to visit your local Emmaus or any charity store for that matter (if you dont already) when looking to upcycle furniture. It’s a great way to recycle AND give back to the community.
You can read more about Emmaus UK here and all the amazing work they do! You can also check out some of my other bedroom makeover projects here:


Here are some gorgeous dresser makeovers from our painting guru Contributor Patricia from The Wood Spa!


Yours was the best!
Ahh thank you!
I love the handles on this piece! I can see why you fell in love with it and the finished piece is gorgeous!! I love the painting technique you used 🙂
Lianne | Makes, Bakes and Decor
oh my goodness Yes!! This is gorgeous.. I know you said you husband wasn’t a big fan originally but if you’re like me I can visualize a project makeover in my head but can’t quite explain to my husband what it will look like and then when it’s done he says ‘ah, now I see what you meant and then likes it’ .. Anyhow this is gorgeous.. hats off to ya. I love it..
Cheers Marie
Aww thanks so much!
Starting with a plan and veering off the path into a different direction has its benefits. The dresser turned out beautiful! It’s unique and classic at the same time. Love it!
Thanks so much Suzanne!
You’ve done a great job, Medina. Brilliant idea to give it a makeover instead of just painting it. I must say it looks so much better now. Vintage with a contemporary twist.
Thanks so much Juan! Glad you like it 🙂
I love it! it was beautiful!
It turned out beautiful! I’m bringing back my Monday link party @ DIY Home Sweet Home (first one will be Oct. 16th) and I would love for you to stop by and link up your dresser makeover or any new projects your working on! http://diyhshp.blogspot.com
Of course! Will do 🙂
Medina this is a work of art! You have taken a plain Jane mcm and made it special. As it happens I am also working on an mcm, more like fighting with it, and you have inspired me to not give up!
Aww thanks so much Mary! Good luck with yours, Im sure it will be amazing!
Wow, I love the new look you gave this piece! Thanks so much for sharing it with us at The Creative Circle Link Party!
Thanks for having me!
I would of fallen hard for that piece too. I love how you gave it new life. Thanks for sharing at the Inspiration Spotlight party @DearCreatives Pinned & sharing.
Thanks so much Theresa!
It looks fab Medina!! What a treasure trove Emmaus is! I’ve never heard of it before — and I DO love a good charity shop!! Thanks so much for linking in with us — I love your upcycling tutorials!
Love the effect of plan b – sometimes you just have to adapt hey? 🙂 #homeetc
So true! Thanks!
Wow!! Just love it…Amazing transformation …?❤
Thank you 🙂
LOVE this transformation! Amazing that you thought to add that painted bottom. It looks totally designer!!
Thanks Victoria!
Medina, you truly are a gifted creative person. What a gorgeous transformation. Your work just keeps getting better and better, xx
Thank you Maria, that is so sweet of you to say!
Love the transformation. The new dark varnish has made a huge difference and I love your quirky paintwork. It’s now a pretty damn cool dresser.
Ahh thanks so much Claire!
This is so so so beautiful! I love how you added that white colour at the bottom and it looks great against that dark stained wood! Very impressive! #HomeEtc
AHH I’m glad you like it!
The more I see this dresser, the more I love it. You did a wonderful job Medina! And thanks for the mentions 🙂 Your “guru” just learned a lot from this tutorial.
Haha thanks so much Patricia .. actually going through some of your tutorials really helped a lot!