A few months ago, I stumbled across the instagram account of Evygenia . You all know I’m a sucker for creative small space ideas, so when I saw her stylish and affordable approach to renovating her tiny flat, I was immediately hooked! I asked Evygenia to come on here today to share her most recent project – an IKEA SKADIS Hack for her mini office space. Enjoy!
………
Hi everyone!
Its Evygenia from Foxy and Brass!
Today, I’m going to show you how I hacked the IKEA SKADIS pegboard to fit in my desk space alcove.
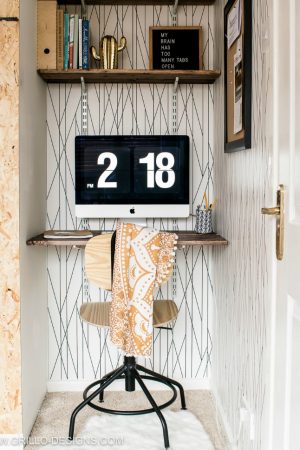
Here is how my office space looked before I added the pegboard.

And here is how it looked after…

Big difference huh?
This simple and cheap IKEA SKADIS hack has allowed me not only to create a gorgeous styled (and better organised office nook), but has also provided me with a way to hide all the ugly wires seen in my first photo.
All the wires are hidden behind the pegboard – in that little space between the board and the wall.

MATERIALS NEEDED:
This post contains affiliates for your convenience, see full disclosure here
- SKADIS pegboard x 4 (46 x 56cm)
- SKADIS accessories: 2 containers, 2 clips, 5 small hooks, 2 big hooks and a shelf.
- Skadis railing or plywood strips
- Sand Paper or sander
- Paint brush
- Foam rollers
- Black paint
- Rusoleum gold spray paint
- Rustoleum Painter’s Touch Ultra Cover spray
- Saw or Jigsaw
- Measuring tape
IKEA SKADIS HACK HOW TO:
Step 1. Trim to size.
I needed the board to fit precisely in the alcove space above the desk, so I measured and cut to size. I also measured around my computer screen as I wanted the pegboard to fit around that too.

Step 2. Sand.
I really didn’t want to have to sand, but I realised (after some tests) that when I tried to paint over the current white pegboard as it was, the paint didn’t stick and just scratched off.
This wouldn’t have been a huge issue if I had planned to use these pegboards solely as wall decoration, but I wanted to use them like proper pegboards — (with the hooks and other removable accessories) so sanding had to be done!
I used an electric sander for the front surface, but I couldn’t find any better solution for removing the paint from the holes other than using scissors to scrape the paint off

I found this part to be the most time consuming! I must have spent about 10 hours sanding.

Step 3. Paint.
I painted every single hole with a brush, one by one, twice. And used a roller for the flat surface.

If you have a paint sprayer for this step, you’re a lucky person! I didn’t have to use any primer, as sanding the board helped the paint to soak into the fibreboard. Here is a how to paint IKEA furniture guide for more details.
Step 4. Make rails and connect board together
Cut plywood strips for wall mounting and paint them black. I hoped to use the original SKÅDIS rail for wall mounting, but unfortunately after cutting the boards the rail became useless, as the wall was too long. If you’re not going to cut the boards, you can just paint the rail black and use it.

Step 5. Paint wall.
Apply black self-adhesive on the wall behind the pegboard (or paint it black). This will help to accent your pegboard cut-outs.

Step 6. Mount plywood strips (or SKÅDIS rail) on the wall.
Step 7. Attach the pegboards.
I used black screws, so I didn’t need to additionally hide them.

Step 8. Spray paint the accessories.
I used Rustoleum Painter’s Touch Gold Metallic spray paint. I was too lazy to sand and prime the surface, but apparently it was a mistake and I highly recommend you to do that.
My coat of gold is not very sturdy, but I used some Rustoleum Painter’s Touch Ultra Cover spray to protect those parts that were in direct contact with the board.

Step 9. Play around with the accessories and admire the result!


I hope you enjoyed this tutorial. If you have any questions about this IKEA SKADIS hack – please leave me a comment below.
You can also visit my instagram page here, or shop my handmade items here
-Evygenia


IKEA GRUNDTAL RAIL BOOK SLING HACK


I’m here for the chair! Where did you get it?? 😍
I love the concept but I was here for mounting a tablet. How do you attach the tablet to the wall, or even on the pegboard?
I have a craft room and i really could use a pegboard. This is such a great and unique option that will surely try
Thanks so much for the idea. i thought Ikea pegboards were plastic ! i have been inspired by your idea to chop mine into 3 pieces to attach to a 3 tiered trolly cart.
Hi! I m writing from France! I love your tuto! I also ask myself what did you use to cut the board in good mesures you needed? Many thanks in advance for your answer! Kind regards ! Anne
What is the couch? Cute!
Super cute mashAllah 🙂 love the creativity here for WFH setups
Thank you!
There is actually a Skadis version without any paint, so you’d need a lot less sanding! I just got one and want to use chalkboard paint on it, that is also magnetic.
ohh thats handy to know, thank you!
Hi – thank you for posting this. I am planning to paint the beg board blue for my 6 year old super creative boy. Do I need to sand all the “ plastic”layer off ? Or just making the surface rougher and the spray it would be enough?? Thank you Denisa
Hi
I love your office space using the Skadis pegboard from Ikea. could you please tell me what material the pegboards are made from? Are they metal or made from a wood material?
Many Thanks
Rach
I love this! I was wondering what you used to trim the edges?
Where is that desk from? is it ikea? can you post a link?
Hi. Is there a way to mount the pegboard without drilling onto the wall?
I dont think so – it needs a good sturdy mount and the best way to do that would be using screws and wall plugs (anchors)
There are the connectors for the desk still in the SKÅDIS family ??
Thanks for posting this hack. I followed your instructions this weekend and it looks AWESOME!!!!
Thats amazing!
I love, love, love how this turned out. Great job as always!
It all looks fabulous. I love the gold black combination and the little touches like the fun dinosaur planters. You’ve done a really good job!
A beauty rooom. I love thiss.
Thanks 4 share
If you have a Dremel handy, that would have made quick work of sanding the holes down (seems like it is the most time consuming part of the process).
Thanks for the tip chuck! So handy 🙂
Love it!
Very pretty and functional too!
Thank you for sharing
Glad you like it 🙂
Using a can of spray paint would made it easier to get into the holes.
Thanks for the great tip patricia 🙂