Learn how to make a DIY planter shelf from the well known FROSTA stool. If you enjoy finding fun ways to display your plants in your home, you’ll love this IKEA FROSTA hack!

[Psst! Join me on Instagram and Pinterest to keep up with my latest posts and ideas. Got a question? Join the discussion in the new HOME & DIY chat forums]
………………………..
The fact that summer is fast approaching has got me all feeling like ‘I need some more plants up in here’ and at least ‘another plantshelfie’. Did you catch the last shelfie I made… from the IKEA Hyllis bookcase?
By the way, I know you probably won’t believe me, but it just so happens to be a huge coincidence that the project I am sharing with you today is yet another IKEA HACK/WALL planter.
Honest.
Nothing whatsoever to do with the fact that on my recent trip to IKEA, I might have overdone it a little with the plant buying.. and the buying of a whole lot of other stuff.
I actually bought 4 of these FROSTA stools ( a tad too many if I’m honest) so deciding to repurpose one of them seemed like a good idea!
(BEFORE: JUST A PLAIN OLD STOOL)

(AFTER: A VERY PRACTICAL PLANTER SHELF)
And yes- it was super easy to make. These hands don’t lie.

MATERIALS USED FOR THIS IKEA FROSTA HACK:
This post contains affiliates for your crafting convenience, see full disclosure here
- 1 x IKEA FROSTA stool. It’s quite a well know stool but if you’e not sure what I’m talking about.. this is what it looks like. You can buy it from your local IKEA store or on AMAZON here

- Drill and hole saw kit.
- liquid nail glue – this is my favourite brand!
- Jigsaw or circular saw
- furniture self-adhesive covers
HOW TO MAKE A DIY PLANTER FROM THE IKEA FROSTA STOOL:
There is no need to assemble your stool if you have just bought it brand new. You’ll need the seating and legs separately anyway.
Cut the seating in half with your jigsaw or circular saw. Make sure you measure before hand so you get two perfect halves!

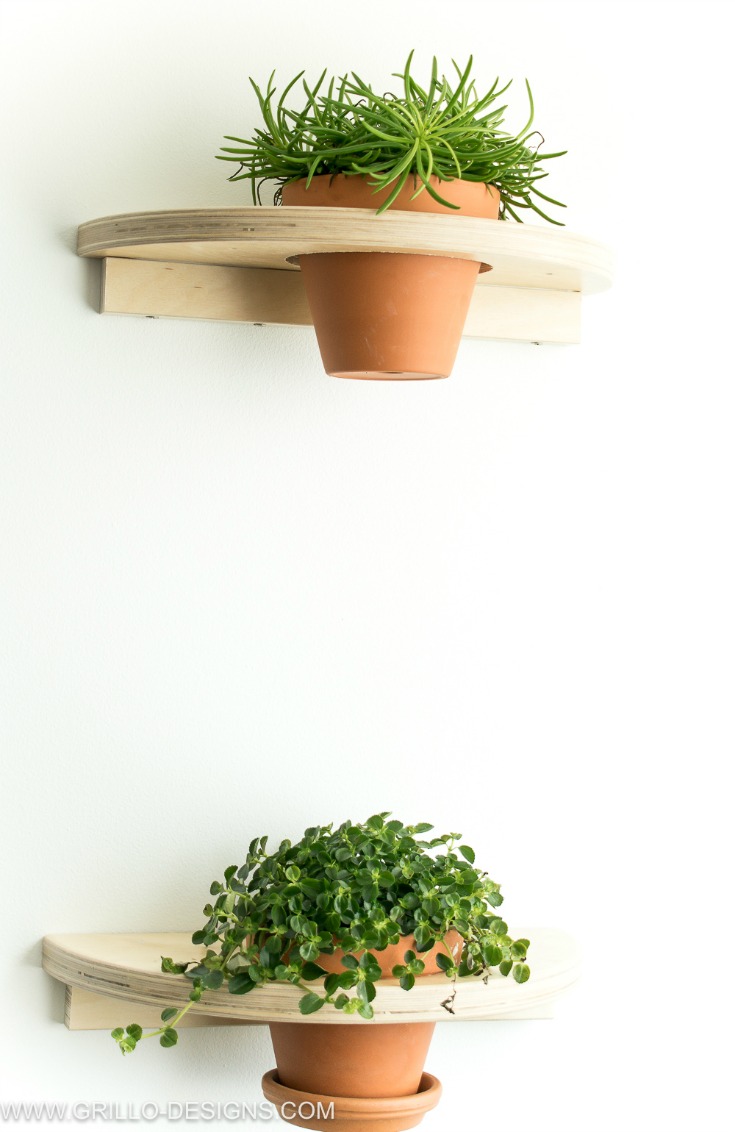
Make a hole in the center of each semi circle using your hole drill .Measure and mark the center points for each shelf . I used a 5″ drill piece.

The hole you make needs to be slightly smaller than the plant pot size circumference so it doesn’t fall through.

Next you need to cut the IKEA FROSTA legs to the length of each semi circle – these will become your shelve brackets.

Using your liquid glue, attach your ‘brackets’ to the back of your semi circle and leave to dry overnight


You can then secure the brackets further with nails or screws using pre-drilled holes ( we opted for screws). I used these furniture self-adhesive covers to hide the screw holes

The last thing you need to do is work out where you want your shelves to go and attach to the walls with appropriate wall fixings. Then, add in a few of your plants

You can also paint these planter shelves if you want (check out my how to paint IKEA furniture post here). I chose to leave mine natural …. at least for now anyway!
I glued a drainage dish to the bottom pot with gorilla glue (with added penny coins in between to keep a little gap between the pot and dish). When I water the top plant, water drains to the plant below like a trickle waterfall effect!


Before I go, I thought I’d leave you with a few links to some of my die hard IKEA FAN places I likes to hang out! Here goes:
- ON REDDIT – the IKEA Hackers forum (not owned by me, but has some awesome ideas)
- ON PINTEREST – the most popular IKEA HACKS will be found here, I promise you
- ON THE WEB: the official IKEA HACKERS website!
- ON FACEBOOK – Join my super fun ALL THINGS IKEA group


You might also like some of these other IKEA HACKS, because lets face it… if you’re reading this, you’re probably an IKEA fan like me!


Or check out my other planter ideas!


I loved this DIY planter shelf. This is really an amazing tutorial. Thanks for sharing.
Brilliant idea! I love a good Ikea hack. If only we had an Ikea closer to us. We have to travel a few hours to get to one. Maybe that’s a good thing, though. Ha! I love this idea so much that I’m featuring it at this week’s link party.
Thank you for linking up to the create, link inspire party. I have featured this project and can’t wait to see what else you come up with!
I love, love, love these ideas. Fabulous
Love the planter shelf DIY Thanks for sharing at the #InspirationSpotlight party @DearCreatives Pinned & shared.
Thank you 🙂
Very ingenious IKEA hack, it looks great!
Thanks claire!
Amazing transformation Medina!
Thanks Janice!