Are you considering wallpapering your floor? If so, it might be a good idea to read this first. In this post, I’m sharing my honest review of my wallpapered floor 2 years on!

This post may contain affiliate links. Please see my disclosure page here
Well here it is . . .
The post lots of you have been waiting for me to write (or at least that’s what my ego has been telling me . . I could be wrong of course). Last year I wallpapered my laminate porch floor (or should I say ‘applied self-adhesive paper’ before the keyboard worries hit me with full force). Check this post for how that turned out!
The original post was .. and still is one of my most popular blog posts to date! The video tutorial has been watched over 74K times thus far – insane huh? ( although some of the comments on that video, I could have done without if we’re being really honest).
I even included this project in my book that I wrote last year, because well, I felt like it was one of those DIY projects every renter needed to try at least once in their life. I mean are you even a renter, until you’ve wallpapered your floor?
(VISIT MY NEW WEBSITE FOR RENTERS HERE)
As I’m sure you can imagine, I’ve gotten quite a few comments and questions about this project over the years . . .
- Does this really work? YUP!
- Can I do this in my bathroom? YUP!
- How do you clean it? With a mop, bucket and water… like you would any other floor.
- is it really temporary? Will it ruin the floor underneath? You’re about to find out!
- How long will it last? For as long as you want it to.
- How is it holding up? Keep scrolling!
Most of these questions I can answer in a flash, but the ones about durability and longevity, I thought it best I wait it out before giving you my honest verdict . And as for whether it would damage the floor underneath, I could only comment on that once it was time to remove it. That time is today.
Here is a reminder of how my floor looked when it was first done in 2017. The wallpaper was provided by Astek Home – a wallpaper company I had been collaborating with at the time.

Then in 2018! Doing pretty well don’t you think?

And 2019! Shot by the lovely Kasia Fiszer
If you look really closely at this picture, you can see some of the damage starting to show under the left leg of my bench.

And finally in 2020!
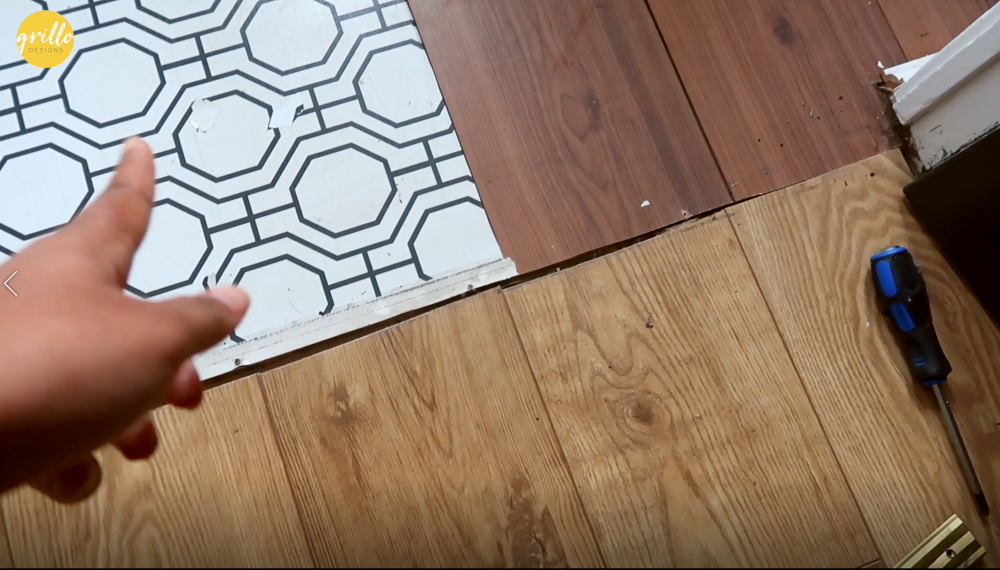
To be honest, I forgot to take a picture of the whole space this year before I pulled the wallpaper up in January (I know, I’m not a very good blogger am I?) . But I have a few video screen grabs of specific areas . As you can see, most of the damage/rusting/tears was around the legs of my DIY bench.

Watch my video below if you want to see it all in more detail, as well as the removal process. Did it damage the floor underneath? Well you’re about to find out!
SIDE NOTE: I’ve only just noticed but my husband is wearing the same T-shirt he was wearing in the first install video. HA! Random.
Now here are my final thoughts. This might be useful should you ever consider trying this flooring idea yourself!
What I loved about my wallpapered floor:
- The almost instant change. I went from a boring, scratched looking floor to a sleek tiled one in less than a few hours!
- The design. The thing about wallpaper is that there are just so many different styles and patterns to choose from. You’re much more limited when it comes to traditional flooring.
- Easy removal. It actually turned out to be really easy to remove once we got the hang of it!

- Affordable. Buying a roll of wallpaper or contact paper can sometimes be cheaper than buying a new flooring and getting someone to install it.
- Temporary. As you’ve seen from the video, once the wallpaper was pulled up, there wasn’t any damage to the original flooring. If anything, it added a layer of protection!
Things I would do differently if I ever wallpapered my floor again:
- When placing heavy metal furniture on it – I would definitely invest in some protective foot pads like these ones here
- I would choose a paper that didn’t have so much white in it. As we all know, white shows everything! Everything!
- I would use a more hard wearing varnish, and maybe do a few more coats! I Like this maybe? It can’t hurt right?
Things YOU need to consider before wallpapering your own floor:
- Durability: I truly believe wallpaper is durable enough to survive a good amount of foot traffic as long as the installation process is done right! And by right, I mean you need to make sure you are applying heavy coats of polyurethane to create a tougher surface. Also I know I’ve said this many times before, but a wallpapered floor only really works best in spaces with smaller floor surfaces, like cupboards, small bathrooms, powder rooms or porches etc.
- Traditional Wallpaper or Self-adhesive: I’ve actually wallpapered my floor with glue before (my kitchen floor in my previous home) and it was a MUCH longer installation process – see the post here. And although using traditional wallpaper in this way didn’t damage the floor underneath, it took forever to pull up. For an easier life I would recommend self-adhesive wallpaper or contact paper, but it can be a little more expensive! See my favorite places to buy temporary wallpaper from here
- The furniture: Do I think my wallpapered floor might have lasted longer if I hadn’t placed the metal bench on top without protective pads? Yup, most of the damage was down to the pressure and rust from the legs. So please keep this in mind!
- The Gaps: If you are wallpapering over a laminate or other hard flooring, the grooves shouldn’t be more than 5mm wide or over time the wallpaper will sink in and tear. You can consider filling the gap with clear grout or sealant before installing the paper , but I’m not sure how that would look once the paper is removed.
And that’s really all I have to say about my wallpapered floor. If you have any questions please drop them below!
My porch is currently undergoing a makeover (whats a girl to when in isolation right?) , which I hope to be sharing soon. Here’s a sneak peek at the new flooring (its lino by the way . . . another cheap flooring alternative). I bought the door mat from here
Follow me on Instagram for more behind the scenes decorating!


Thank you so much. You saved my house!!!!
Thank you for the wonderful suggestion of wallpapering your floor! I am going to try to wallpaper a faux runner on my stairs now. It was only a thought before but now I’m going to put it into action.
Hi, Lovely video.
I just finished rewallpapering my bathroom floor. Pics on instagram
The previous paper had lasted 10 years and it was only due to my lack of maintenance that it deteriorated.
I use about 10 coats of varnish initially and it needs a quick revarnish every couple of years.
I had the 120gram wallpaper custom printed and used the varnish itself as adhesive.
Not tried to lift the paper.
Damage can happen if you drop something hard and sharp.
Im in London, your accent sounds like a Londoner too
This is such an awesome project. I want to do it in the laundry room floor
This is so ridiculously awesome!! I am always fighting the tension between a small budget and big dreams and I know how that can lead to insane creativity! Do you think this might work on concrete floor?
You have inspired me! I’ve hated my bathroom floor for so long! But may I ask, would the clear varnish be slippery if you had wet bare feet?
I’m want to do my kitchen in ontario…..flooring linonlium n got that cancer causing shit in it ..can u wallpaper it
i dont see why note done it in the past
This is the BOMB!!!! I just finished painting my bathroom floor with the new Rustoleum at Home paint, it worked fine and looks so much better but dang, I wish I would have seen this idea first! It really looks great and you did such a nice job. Thanks for sharing
Thank you!
You can use a Mr. Clean eraser to get the rust from the bench off. If it’s really bad this will at least lighten the appearance. Also you can take the bench leg and wire brush off the rust then spray with a black spray paint for metal. Some people may even apply a clear sealing coat over the black. The point is no more rust stains😊
My hope is that you won’t have to redo your floor until you move.
Thanks for all your amazing posts.
Where did you get your checkered Lino flooring for your kitchen from? I am in love with it. My house has this ceramic tile that I want to put temporary flooring over, would Lino work?