Organise your kitchen cooking essentials with this super easy DIY utensil rack tutorial!

I don’t usually share quick DIY projects on this blog, but I’ve decided to change it up a little. You know, New Year and all.
I also have a habit of over-complicating things to Einstein’s level. Simplicity, as a result is very much needed and appreciated.
I’ve teamed up with 5 other awesome bloggers for this quick DIY challenge idea because thankfully, I’m not the only one who wants to keep it simple this year . This month’s theme is organisation (sorry the British in me stops me from putting a ‘Z’ every time!) and let me tell you now …. this is NOT right up my street!
However I do like a good challenge…

[PSST! JOIN THE ORGANISING DISCUSSION IN OUR FORUM]
Do you remember that post I shared on ways to declutter your kitchen countertops? Well it got me all inspired to think about how I could better organise my kitchen. I started with clearing out my cooking utensils from my top drawer ..
BEFORE:
Lets not pretend that this sight isn’t just the slightest bit pathetic…and sparse looking (is that the right word?). As you can see, I don’t own many cooking utensils because Jamie Oliver, I am not.

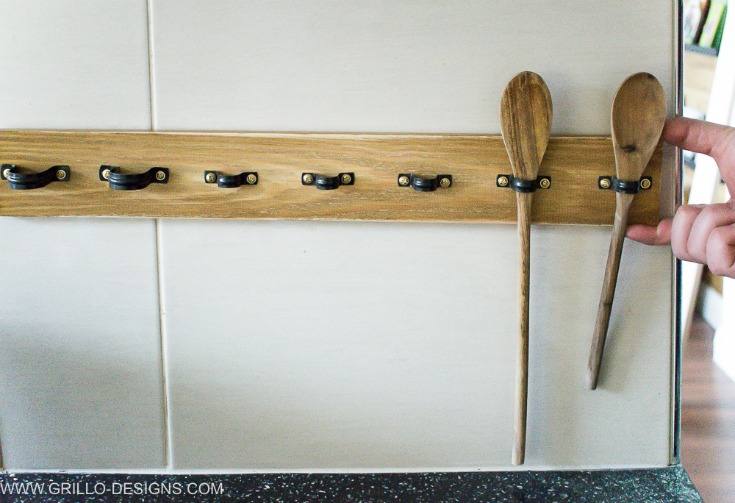
AFTER:
What I am though, is a pretty good ‘imaginer’ . I made a wooden DIY utensil rack from plumbing clips (need I say more about my love for industrial and rustic style?). I might be slightly biased here, but I think this is way more practical than keeping utensils in a drawer!


You can see what my other blogging friends made for this quick DIY challenge by scrolling right to the bottom of this post.
MATERIALS USED TO MAKE THIS DIY UTENSIL RACK:
This post contains affiliate links for your convenience – please see full disclosure here
- Wood (Measurements: 20″ L x 2.5″ W. Thickness 0.3″). You could also use pallet or crate wood for this as the wood is very light
- Plumbing pipe clips. I used 5 x 15mm and 2 x 28mm sized clips
- Clear polyurethane if you are sealing your wood.
- Screw driver ( an electric screw driver gets it done even faster, this is the one I have)
- Small Picture hanging screws
- Pencil
- Measuring tape/ruler
- Command strips (medium)
HOW TO MAKE THIS DIY UTENSIL RACK:
Seriously this was quick (excluding the paint drying time of course) – I wasn’t kidding about the 10 minute thing!
As you can see, the pipe clips were originally copper. I spray painted them black because frankly, I’m not a huge fan of copper decor, but hey each to their own. If you dig the look, leave them as they are by all means!

I already had wood planks left over from a previous project- luckily it was already stained with my favourite dark oak varnish. I just cut it to about 20″ long and gave it a quick sand to make it look slightly more weathered.

Next was figuring out where to place the plumbing clips. I used a ruler to measure out equal gaps, marking it all with a pencil. I ended up using five of the 15mm clips and 2 of the 28mm sized clips.

Once everything was marked and measured, I screwed the clips into place with a screwdriver. The picture hanging screws I used worked great – they were just the right size and didn’t push through the back.

Here is how it looked with the plumbing clips all in place. Notice I used the larger clips to the left and the smaller ones to the right.

ATTACHING TO THE WALL: I was very reluctant to hang this utensil rack with screws because our kitchen backsplash is tiled. We rent and although I’ve never shied away from hole making to hang a picture or shelf (with the intention of filling them in upon moving), drilling into tile was a different ball game! If they just so happened to crack in the process, I wasn’t prepared to pay out for new tiling!
Also, I didn’t want my Landlord to hate me. That’s kind of a deal breaker if you don’t want to end up homeless.
I ended up using 4 command strips (the medium size that hold about 2kg in weight) to the back of the rack.

I was initially very dubious about using command strips for this sort of thing but gotta say, I’m pretty impressed. It held the weight of the added utensils really well.


So whats your verdict?? Will you be making a this diy untensil rack any time soon?


Make sure to check out all of the other ladies who are sharing #10MinuteDIYs!
by Brittany Goldwyn // D.N.A. Designs // Love Create Celebrate // Pocketful of Posies // Uncookie Cutter
Like this? PIN IT!

IF YOU LIKED THIS POST, YOU MIGHT ALSO LIKE SOME OF THESE OTHER POSTS WITH MORE HANDY DIY ORGANISATION TIPS!
HOW TO RID YOUR COUNTERS OF CLUTTER

HOW TO GET ORGANISED BEFORE A HOUSE MOVE

DIY ROLL OUT UNDER BED STORAGE BOXES
MAKE AN UNDER BED TOY STORAGE BOX


Home and DIY
Organizing
Cleaning
Crafting
Introduce yourself!
Looks amazing! I believe I have everything to make it in my garage! It will be my gift for mother’s day!
Video aout covering up the floor, want to know in 4 to 6 months how it holds up
Yup its been just over a year, and has held up well! I will be sharing a post on it it in the next few months!
I like this idea, but I’d end up snapping those wooden utensils pulling them in and out.
Haha I doubt it!
So glad I found your site! I love these ideas I am finding!
I may have missed it in the description but how do you take off the measuring cups?
The measuring cups have a little hook at the end. I hooked them on to the plumbing clips and then when I use them I just unhook them
This is such a cute and clever idea! It looks fabulous in your kitchen!
Thank you so much!
I think this is such a smart idea Medina! And it looks beautiful! Pinning!
Cat
Thanks cat!
Love the industrial look of this! Very cute!
Wow – super cute, easy, and useful! Great project. =)
Thank you Natasha
Hi I Love your utensil rack but I do have a thing about copper so probably would of left the clips, the black does look good though. I like the tip about using command strips rather than drilling into the wall too.
This is GENIUS!! I LOVE the idea! I’ve been dreaming up something like this and I’m SO glad you shared it! Soooo inspired now!
Thanks so much lindi!
I love this DIY, it is so easy and elegant. Love it.
Thank you 🙂
Absolutely stealing this idea! We don’t have a ton of wall space, so I think I want to mount it to the inside of a cabinet.
Thanks Brittany!