*Thanks to Abodent.com for partnering with me on this DIY under bed storage project! This post contains affiliate links.

I may or may not have just laughed at the title of this post. If you’re British, you’ll probably get why. If you’re not, and haven’t a clue what I’m on about, here’s the urban dictionary’s take on it.
Knob = The name that is given to an individual that is being a complete moron, idiot or dumb-ass. Also lacking in common sense
I’m pretty sure we can all think of a couple of people in our lives that fit that description … right?
(There were a few other definitions on there too but lets keep this PG rated!)
Jokes aside…
I’m here to talk about a different kind of knob today. The cupboard and pulls kind. The ones you might find on gorgeous upcycled pieces or designer furniture that just exude contrast and character.
Well Ok, I don’t know much about designer furniture , but I do know a thing or two about making things appear that way (in other words – how to fake the expensive look). And also how frustrating it can sometimes be trying to find the right hardware to fit your decor or projects.
So of course, when Abodent got in touch to collaborate with me, I was beyond excited!! My first thought whilst browsing their online shop was, WHERE HAVE YOU GUYS BEEN ALL MY LIFE??
Ok, maybe a bit much, but I really felt like I had struck gold!
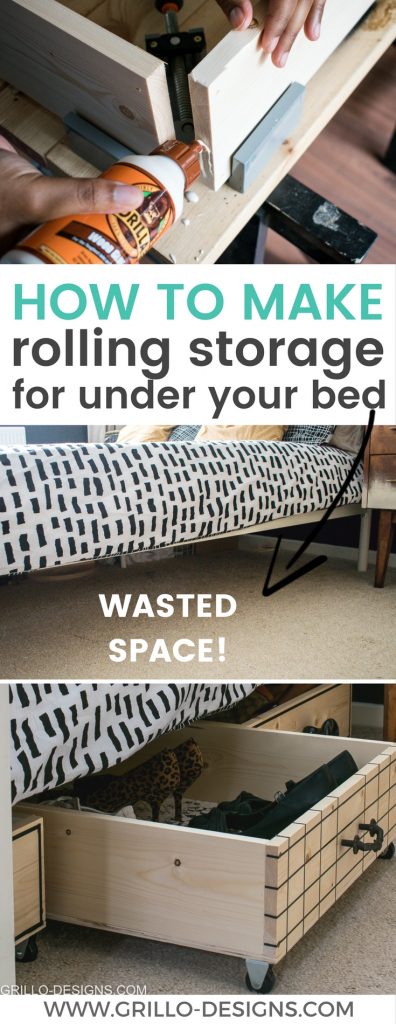
I decided I was going to try out some of their contemporary vintage style knobs on DIY under bed storage boxes I planned to build. Here’s how they turned out!

If you’ve read my previous post where I was forced to create a compact diy beside table, you’ll know just how tiny my bedroom is. These rolling under bed storage boxes are the perfect space saving solution for storing, shoes, bags and other stuff you cant shove into the wardrobe!

Below is my quick tutorial on how to make them and I have also included a roundup of my favourite modern vintage style knobs from Abodent!
FYI: I’m pretty pleased with how the bedroom makeover is progressing (UPDATE: the bedroom is finally done – take the tour here!)

[Psst! Join me on Instagram to keep up with my latest going-ons and behind the scene ideas]
MATERIALS USED TO MAKE ONE DIY UNDER BED STORAGE BOX:
To build:
- screws (40mm long)
- Power drill
- Mitre saw
- 90 Degrees angle clamp – optional
- 4 x Castor wheels (40mm)
- Wood (w 18 x 144 x 1800mm)
- 1 x sheet of Plywood (9mm thick)
- Wood glue – any brand will do but I used this one
- Tape measure
To decorate:
- Black Washi tape (6mm thin)
- Wallpaper – this one I bought off ebay Uk!
- PVA or Elmers glue
- 1 x ‘handle hands‘ knob
- 2 x ceramic knob
HOW TO MAKE A DIY UNDER BED STORAGE BOX:
1. I know it’s pretty mundane, but it’s always a good idea to work out your measurements before building – ANYTHING! I measured the width and height of the space under our bed frame to work out how big I needed the boxes to be (and also how many I could squeeze under there!)

Can you spy all the junk under this thing??
2. Next I cut the the wood into four pieces with my mitre saw.
It’s important to add here that before I became all DIY fancy, I used basic tools like manual saws and/or a jigsaw to cut my wood. Hard graft – but it works!
Manual tools are a great alternative if you dont want to shell out money on the big guns.
So the goal was to make a box – rectangular in shape.

The longer pieces would make the sides and the shorter pieces – the front and back
3. Pre-drill two holes to each end of the wood. I stacked the two sets of wood on top of each other to save a bit of time!

4. Assemble the corners of the under bed storage box.
Squirt wood glue to the ends of the wood.

Attach the two ends of the wood together at a 90 degree angle (TIP: I used this handy angle bracket clamp to ensure the angle was dead on straight) and secure in place with two screws.

Do this on all four corners until you have a rectangular box!

5. Cut the plywood with a jigsaw or circular saw to make your base . You can use your box to draw out an outline before cutting (you need this to be perfect!).

Screw the base into the box frame (pre drill holes before screwing!)
6. Then, screw in the castor wheels to all four corners of your under bed box -and voila you have a box that rolls.

Hey I forgot to mention earlier but when measuring out the sizes of your boxes – dont forget to take into account your wheels size too!

7. You’re almost there – now decorate! I went for a modern natural look and so decided against staining the wood (or even painting). I found Washi tape was great for this part

I also added in wallpaper to the insides of the storage boxes – this is the same one I used for my wardrobe makeover.

And then the knobs! These are the ones I chose. Handle hands and the ceramic knobs from their vintage range.
I screwed them to the front of the box by pre-drilling holes to the centre. Don’t forget to measure width and height (then half those figures) to ensure you get your knobs smack bam in the middle!

This ‘handle hands pull is particularly gorgeous isn’t it?


I’ve rounded up a selection of other knobs from Abodents’ cupboard knobs range that have that modern /vintage look!
MODERN VINTAGE KNOBS ROUNDUP

CLICK BELOW TO VIEW EACH KNOB IN MORE DETAIL
1. Textured Stamp // 2. Mottled Ovate // 3. Scandi // 4. Faceted Wood
5. Pearl lines // 6. Dots and Drops // 7. Pan Face // 8. Queen Bee
9. New Deco Pull // 10. Cannon ball // 11. Floral Plate
Don’t you just love them!! Also international shipping and if you use ‘grillo-designs’ at checkout you get 10% off! It really doesn’t get better than that right??
Aside from the knobs though, I hope you’ll give these DIY under bed storage boxes a try! Drop me a comment below if you have any questions. You can also check out some of my other bedroom projects below!


-Medina

*This post was sponsored by Abodent. I only partner with brands I LOVE! . All ideas, photos and opinions are 100% my own*
HOW TO TURN KNOBS INTO WALL HOOKS


DIY UNDER BED STORAGE USING A DRAWER

I found your post while desperately looking for a DIY bed with built-in drawers for my son’s tiny room. This is brilliant. It occurs to me I could take old drawers from a dresser and paint/decorate them as I please, and put wheels and unique knobs on them.
Yes Ive done that before too 🙂
Awesome Idea. Thanks for sharing with us.
These are amazing! I’m looking for something exactly like this but struggling to find the right size to fit under our bed. I’m a newbie woodworker but this is really helpful.
Do you think it’s possible to set the castor wheels back slightly on the fronts so they show less?
Oh yes of course! You can even get prettier looking ones if you like!
I’ve got drawers, where or who makes the headboard. A headboard with grab bars is great for someone with mobility issues.
Love the idea of personalizing the drawers.
Great idea…..even a knob will be impressed with a choice of those knobs ! hehe
Love it ! 🙂
Beautifully decorated!! I love your eye!!!
Ahh thanks so much Beth!
This idea is perfect timing for me! I just had my wall unit remodeled to hold the bigger TV. This required removing the center area which had drawers. I have been looking at these well constructed drawers wondering how to use them! Bravo!! I’ll put some coasters on them and slide them under the bed!! Yahoo
Yay!! Sounds perfect! I’m really glad you liked this DIY it’s really so handy
Isn’t under bed storage just the best?? I absolutely love your tutorials as always and think your ideas are so clever. You also have a rather fabulous shoe collection that I spy there 😉 Thank you for linking up to #HomeEtc
Firstly, yes I sniggered at the title! Your boxes are a great idea. We currently use plastic storage boxes but after spending so much time on the bedroom I hate how they look. Wooden storage would look so much better and seem quite easy to make yourself. I love the handles you used, the handshake one is adorable #homeetc
I found your blog whilst browsing the awards site. This post has just absolutely made my day! What an absolute legend!
Thank you for bringing sunshine to my otherwise rainy day!
Ahh thanks so much Sophie – glad you enjoyed it!
I keep coming back to read it! The title just cracks me up!
Love it!
The space under my bed is absolutely wasted (I think only the tripod lives there when not in use). I like the idea of smaller drawers to store different items. And let’s not forget it’s easy to clean too.
I love this creative idea. Very practical! We slide things under the bed, why not have something nice, useful, an organizable. I also love the fab hands draw pull.
Thanks Ivory – glad you like it !
Those turned out great!!! Love the knobs and what a great selection of vintage knobs they have. I will definitely keep them in mind for my next project!!!
Thanks Susanne! They are an amazing store!
Wow I am so inspired by this post and you are such a DIY Queen. I also love your style. Beautiful!
Aww thank you!
Great looking DIY project, I have to say I prefer the checked one between the two!
Thank you jennny!
Great idea to create some extra space. I love the vintage style of the knobs. For me it would have to Bebe the queen bee. I love the colour of this one too.
OHH thats my fav one too!
This is genius, you’re such a clever girl. And your DIY skills are very impressive ? I love the use of wallpaper inside of the drawers ?
Thank you hun xx
My husband loves woodwork and I’m loving all the knob options. Never heard of this brand before so thanks for sharing!
They are great you should check them out!
These are BEAUTIFUL. I hate the tupperware boxes under our bed, but I desperately need the storage too! I definitely want to give this a try … they look fantastic and I love the fact that they’re on wheels, so easy to access. I’d just want to add a top to mine for upstairs so that moths don’t get into them (where I store my winter clothes, although I could always use vacuum bags too), but I think it would be fabulous as is for shoes!
xo Jaime
Angloyankophile
So glad you like them! Thank you 🙂
Medina, great way to use the wasted space under the bed!
Thanks Jann!
Love you the geometric pattern on the front of the box and your choice of knobs. I really like the bee knob in the round up too!
Thanks Claire – that one is pretty right!