An easy tutorial on how to upcycle the IKEA MARIUS stool into a rustic industrial side table – arterfect as a nightstand for a small spaced bedroom!

When it comes to decorating our house, my husband is a pretty easy going guy. By easy going I mean, he usually takes a back seat and just lets me do my thing.
For example (and these are real life examples I might add)
Me: Hey Vince, should we paint this wall room black? And the ceiling too?
Him:Yeah sure why not.
Me: Hey Vince, do you mind if I decoupage the washing machine ? With fabric?
Him: Go for it!
Me: Hey Vince, I know you’ve literally just put the TV on the wall over there, but I’ve changed my mind. Can we put it on the other wall please?
Him: Ok, Yh if that’s what you want? Is this what you want?
You get the picture…. super chilled..
Then one day…this happened.
Me: Hey Vince, I think we should swap our King size bed for a double size bed instead, our bedroom room is way too small.
Him: No
(Silence)
Me: No?
Him: Yes no.
(More silence) …. obviously, I’ve never prepared for the ‘he said no’ scenario
Me: ‘But, I really think-
Him: No. I like the bed we have.’
(FYI: pictured below is the bed in question)

Bed frame: Next UK / Duvet cover: Argos UK
Me: Oh okay…. then?
And that was that. I respected his decision for the simple fact that he rarely said no without good reason. I still died a little inside though.
So, huge bed… small room. What’s a girl to do?
I was forced to re-think my whole floor plan and find other ways to save space. Thankfully our freshly painted wardrobes (oh god thats another crazy story you might want to read) were built in and didn’t take up much room. However, in terms of other bedroom furniture, i.e bedside tables (you know, for all the useless junk we liked to store within arms reach of our bed), I needed to keep it small and compact .
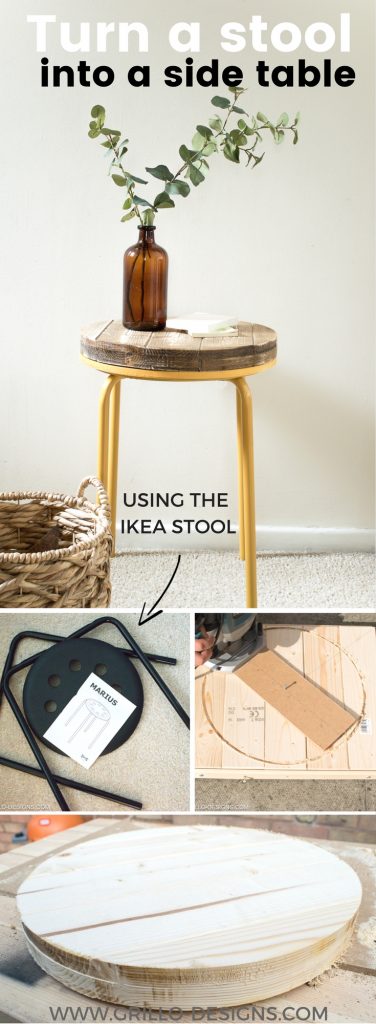
The IKEA MARIUS stool seemed like the perfect starting point for the industrial side table I had always wanted, and at a whopping £3, I was saving quite a few pennies

What’s the deal with all the IKEA hacks, you ask? God, I wish I knew.. I don’t even realise I’m doing it anymore.
MATERIALS YOU’LL NEED TO CREATE AN INDUSTRIAL SIDE TABLE:
This post contains affiliates for your crafting convenience, see full disclosure here
- IKEA MARIUS stool
- Hard wood timber W 8.9cm L 240cm T 3.8cm (2′ x 4′) – I bought this from my local hardware UK store Wickes
- MDF wood.
- Spray paint Primer
- Spray paint Yellow
- Spray on varnish (Polyutherane)
- MDF wood (of at least 1cm thickness)
- Gorilla glue (or alternatively you can use the US brand DAP)
TOOLS NEEDED:
- A power router
- Jigsaw – I always use the Ryobi brand which is sold through Amazon
- Sander
HOW TO TURN A STOOL INTO AN INDUSTRIAL SIDE TABLE:
PART ONE: PAINT THE STOOL

It doesn’t really matter which way you choose to do this, but I decided to paint the stool first. I thought a brighter colour would really make the ‘industrial side table’ pop against my dark bedroom walls (see in previous picture above).
So mustard yellow… that was the gorgeous colour I chose.

To achieve the best result for this colour, I spayed on two coats of white primer (here is a US alternative)

followed by two coats of mustard yellow spray paint for the finish. Once all the paint was dry, I spray painted with varnish (also known as polyutherane) to seal it all in and prevent future chipping or scrapes..
If you’re unsure about this whole painting thing, I have a great article you can read which explains exactly how to paint IKEA furniture.

PART TWO: CREATE THE TABLE TOP
For a slightly less complicated route, you could use a round wooden chopping board for the table top as explained in this tutorial by a very talented decorator I met on Instagram.
However….
I wanted a more chunkier style table top that looked similar to the bench I built a few months ago. So this is what I did (it involves some serious DIY- but please do not be put off. If I can do this, you can too!)
1. With a jigsaw, I sawed the wood into 5 lengths (basically a rectangle slightly bigger than the top of the stool – use the top of your stool as a guide or you could used a compass).

2. Each full side of the wood was glued together with gorilla glue and left overnight to dry.

(you could also use a Kreg Pocket Hole tool to connect the wood together for this but I don’t own one yet. Here is a great tutorial on how to use one if you’re interested).

3. Next, using the top of the IKEA stool as an outline, draw a circle with a pencil. Then you need to cut out that circle. The drawing part was a piece of cake, the cutting, on the other hand, was a nightmare!
My husband and I initially used a jigsaw to try and cut the circle.

Huge fail. I’m sure it can be done, but it just didn’t work for us. The wood was too thick and as a result the blade kept bending.
Here’s attempt 1 and 2 -total disaster!


Then my husband did a little research and thats how we discovered a new power tool – a router (not the internet kind)!
When we saw all the wonderful things that could be done with it on youtube, we immediately went out and bought one – that same day. A good investment for the future we told ourselves (also it was pay day..duh!)
The router is an amazing power tool that allows you to cut rounded shapes, rounded corners, and a million other things I don’t know yet, but I’m sure ill soon discover (the focus on this project was just the circle though)

4. In order to cut a perfect circle, we had to use a circular guide for the router. My husband put together a quick one from scrap wood using this tutorial on youtube (pictured above). You can also skip this step and buy a guide kit from here
Nail the guide to the centre of the circle (draw an x across your wood to locate the centre)

And from then on its a simple as moving the router across the wood (with a little man-power). We had to go around the circle twice as the drill piece we used hadn’t been deep enough the first time.
Be sure to wear protective goggles and a mask for all the saw dust particles!
Here is the end result – the circle we had hoped (and prayed) for

5. I also cut out a 2cm thick circle from mdf wood and painted it the same yellow to make the base of the wooden table top.

6. I sanded, then stained my oh so perfect circle with Wickes Warm Oak Varnish (here is a great alternative stain if you’re in the US) and added in some knocks and scrapes with a hammer

7. Finally, you can either use screws to attach the the wooden top to the stool or extra strong wood glue!


Here is a picture of my new industrial side table in my bedroom (although I do like to move it around the house a lot). What do you think?

I really LOVE the yellow against the black wall. Hopefully more bedroom makeover progress shots to come soon (I work at snail pace at the best of times)
Has there ever been a time when your partner has said no to an idea you have proposed – and just would not budge on the NO? Share your stories with me in the comments below – I would love to hear!


RUSTIC INDUSTRIAL STYLE UTENSIL ORGANSER

RUSTIC MASON JAR HOLDERS

HOW TO BUILD AN INDUSTRIAL STYLE BENCH

HOW TO MAKE A RUSTIC SNOWMAN

Greetings from Wisconsin, USA Thank you for the add! I love Apartment Therapy’s site. I’m so glad that I’ve found your site!!! Your small room make over was so clever and unique! I used to love DIYs long ago, way before it became a “thing”. We called it “necessity is the mother of invention”!!! I really like the little office space you created for yourself! I have a small top pedestal table that I have by my chair in our small living room apartment that I put my tablet on so I can read, or play cards or read my crochet patterns. I’ve recently started to have my meals in that chair and have discovered that little topped table is just too small…I’ve been looking for a unique piece to replace it and your IKEA stool is absolutely perfect! Now for the top…I was originally thinking of a cutting board but I’ll have to check out my local hardware store for some other ideas…now that I know what the base will be the New Year is looking even brighter!!!! Thank you and Happy New Year to you and yours!
Welcome Rosalie! So glad to have you here and that you like my bedroom makeover. I know some parts are a little out there haha. I would suggest using a cutting board – I think that would totally work and is much less hassle than what I did. Happy new year to you too!
OMG! This is absolutely stunning. Why have I not known about your blog earlier? I’m definitely coming back for more! Nice to meet you 🙂
Thank you so much!
I am so impressed with this IKEA hack! It turned out gorgeous! #HomeEtc
Medina you are the QUEEN of ingenuity!! It would never occur to me to do something like this!! It’s amazing, I’m so so impressed. Thank you for linking up with #HomeEtc
Aww thank you!
Love this! I feel your pain on tricky jigsaw cuts, we’ve been eyeing up buying a router for a while now. Looking awesome!
Such a wonderful idea! It turned out great! Thanks for sharing it with us on The Creative Circle Link Party!
Love this DIY & the colors you picked for the side table. Thanks for sharing at the Inspiration Spotlight party. Sharing.
This is such a great Idea and I think you finished the chair beautifully! A+ on style 🙂 Popping by from Snickerdoodle create-bake-make party 🙂 Have a beautiful week!gr. Kat
Thank you!
What a clever way to use the stool. It looks wonderful. The color pops so well against the wall. Thanks for sharing your tutorial with us at Snickerdoodle Create Bake Make Party. We’ll be featuring this at today’s party.
Wow – love this! Pinning now.
You had me at Mustard Yellow…love it!!! Thanks for sharing all your great tips!!
Haha Thanks!
My husband has been complaining for years about wanting a king sized bed and I keep telling him absolutely not! We just do not have the space for it. I agree that routers are awesome! Hope you have fun making many more projects with yours!
Hahah! Glad I’m not the only one… and thank you!
Seriously, this is so awesome looking. I’ve passed those stools up so many times thinking they were nothing much to look at. And, I have to say I’m very jealous, I’ve wanted a router for over 10 years. You’d think hubby would have bought me one for Christmas or something. I guess I have to get better at hinting 🙂
Love this hack, you’ve turned a rather boring stool into something more stylish and of course in your signature yellow. I was having a conversation with my husband this morning saying that he should just leave the house to me and let me make all the decorating decisions life would be so much easier if he did. Unfortunately, he didn’t buy it so I still have to compromise, but I’m working on him.
Haha good one Claire!