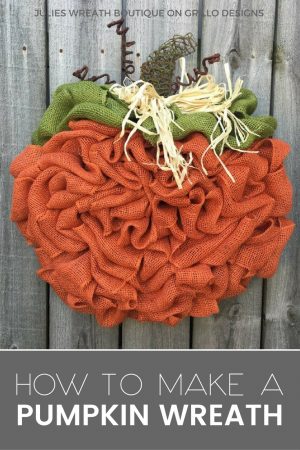
As far as wreaths go, we’ve had quite a few awesome tutorials on Grillo Designs from some very talented crafters. This burlap pumpkin wreath is no exception! Keep reading for Laura’s step by step how to, you are going to love this one! – Medina

Hello, This is Laura from OHANALEE handmade boutique. Today I’ll be showing you step by step instructions on how to make a Burlap petal wreath. And because it’s time for Fall, the instructions today are for a burlap pumpkin version.

MATERIALS YOU”LL NEED TO MAKE ONE BURLAP PUMPKIN WREATH:

This post contains affiliates for your crafting convenience, see full disclosure here. Click on bolded text for material sources!
- 1- 14″ straw wreath form, alternatively foam wreath could also be used!
- 4- rolls of 5.5 inch by 15 ft orange Burlap ribbon (you can buy burlap by the yard but I find cutting the squares from the ribbon rolls much easier)
- 3- Boxes of Floral Greening Pins
- Rotary cutter and cutting board
- Scissors
- Hot glue gun with glue sticks
- Sewing pins
OPTIONAL: Fall Embellishments to decorate
- 1- roll of mossy green chicken wire ribbon
- 1- roll of wired green burlap ribbon
- Natural Jute burlap leaves and artificial fall leaves
- jute wrapped floral wire
- Fall Berry floral wire
HOW TO MAKE A BURLAP PUMPKIN WREATH
STEP 1:

Unroll your burlap ribbon and fold corner over to measure out a square. You will be cutting several 5.5″X 5.5″ squares from these rolls of burlap. This is when I use a rotary tool to make the process even quicker.

Tip: when cutting burlap, try to cut in between the squares of the burlap weave to prevent fraying! Here is a great post on this.
STEP 2:
Fold your cut squares corner to corner

STEP 3:
Then take one outside corner and fold it down to the bottom corner

Next take the other outside corner of the burlap and fold it down to the bottom corner again, meeting all corners together in the center.

STEP 5:
Take your floral greening pin and pin the petal to the wreath form. Starting on the inner part of your form.

Click on the arrow to see PART 2


Where can I get the wide burlap please..wanting greens but not available in England it seems..
Love this wreath, thanks for sharing!! Do you think this wreath could be made using a pool noodle as a base instead of the pay form? The area I’m located in is currently under lockdown so my dollar store is inaccessible at the moment. Thanks in advance for any reply! Jo-Anne 🇨🇦
So much fun. I made mine in a couple of hours. Love love it.
How many burlap squares did you need to complete this project? How many rolls of burlap (length and width) did it take? Thank You!
This is beautiful n perfect way to use the burlap. I love this so much. Thanks much
Beautiful Wreath! I never thought to do it like that! Thank you for the idea!
Love the wreaths and the instructions.
approximately how many 5.5 squares are needed per wreath?
Just beautiful, will definitely put this high on my want to do list. Thank you for sharing the step by step how to!
Happy crafting
CAV
How do you maked the stem with mossy chicken wire?
Yes! I would love a step-by-step on the making of the wire stem. Love this wreath!
Do you think that you could make this pumpkin wreath using inch burplap ribbon? Just curious because that is what I have found in the stores.
Doesn’t look that hard indeed, maybe with a little patient it could work me. Never tried one of these before though, gonna have to borrow some tools ;p
SIMPLY STUNNING!! Just finished My first Halloween Wreath so will make this one for November, thanks for the amazing pic.`s
and step by step tutorial……………
Thanks! This wreath will make a perfect November project. Good luck!
Your burlap pumpkin wreath is fabulous! I love it. We’ll be featuring this at tomorrow’s Snickerdoodle Party. Thanks for sharing with us!
That sounds great and Thanks so much. I love sharing about fun new projects. So glad you enjoy it.
Your wreath is absolutely beautiful, Medina!
Thank you very much, it’s definitely a fun project
My fall wreath is literally falling apart. I need a new one. I am pinning this because it is one of the prettiest I’ve seen. Hope I can put it together and get the same results you did. Thanks for sharing!
I appreciate that. It does involve a bit of time cutting and pinning, but I think the time is definitely worth it. I love the texture this technique makes. Good luck with yours!!
Very beautiful and very well explained ☻
Thanks! I hope you get a chance to try it out. It’s a fun process
This is so cute! I love the step by step tutorial with pictures too! I need to make this 🙂 XOXO
I hope you do, I’d love to see some end results. I’m so happy to share in this fun project